Royal Iris: a Copic and Colored Pencil Vanilla Arts Digi Stamp

 
Royal Iris a botanical watercolor project.  Digital stamp and recipe packet in the Vanilla Stamp Shop. | VanillaArts.com | #coloredpencil #howtocolor #realisticcoloring


Water control = color control

H2Oh! classes approach watercolor from a rather unique perspective.

I learned to watercolor first. And my watercolor mindset has greatly influenced the way I use and teach Copic marker classes.

H2Oh! flips that on its head. I teach my intermediate level coloring students to use their Copic skills with watercolor.

The two mediums are very similar. With one exception...
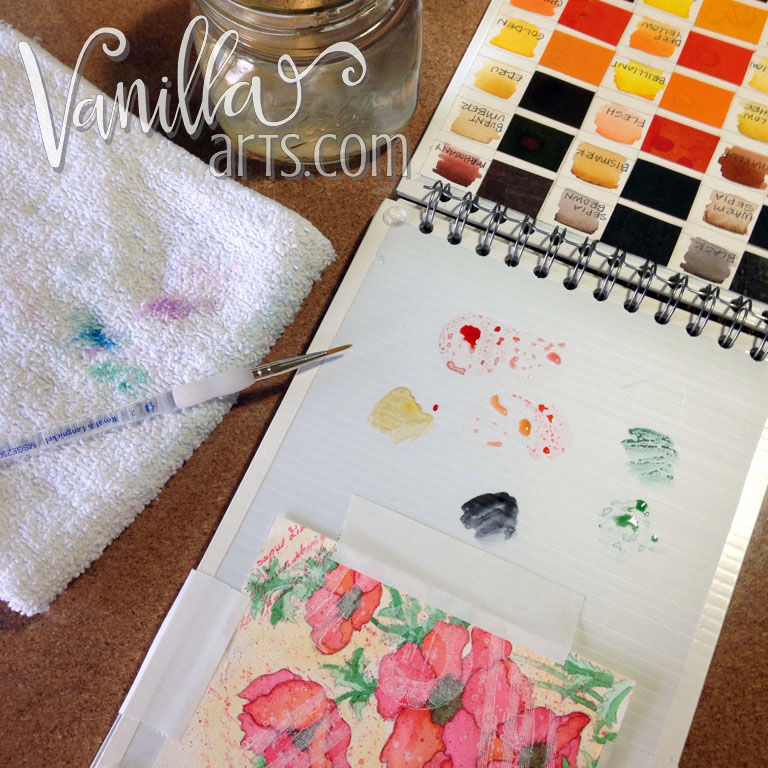
Water control.

In marker, if you want a lighter color, you switch to a lighter marker. In watercolor, you dilute your paint.

How much to dilute... now that's the hard part.

This month we're limiting our color palette in order to concentrate on the strength of our paint. Light green, dark green, light violet, dark violet. It's good practice to see how many colors we can get from just a few tubes of paint.

**Taught as a local class in 2016.**

"Royal Iris" a lesson in water control for beginning watercolor students | VanillaArts.com


Watercolor: Make a Peerless Watercolor Palette

 
Make a travel palette from Peerless Watercolor Swatches | VanillaArts.com


My goal is to do more personal projects this year...

As a teacher, it's really easy to fall into the curriculum trap where everything you produce is either a teaching reference or a prospective lesson.

Make a Peerless Travel Palette | VanillaArts.com

So my solution to this hole I'm sitting in is simple: get the heck out of my studio! Now that the weather's warmer, I'm forcing myself to unplug and head outdoors for some soul-building field work.

In fancy art circles, we call working out-of-doors "en plein air" which roughly translates to "you can't take your 900 pound ceramic watercolor palette with you".

Yep, if it's going to be me and my dog drawing/chasing ducks in the park, I can't exactly drag along my studio paints.

So I went shopping- a little Home Depot, a little Amazon, and a quick stop at Peerlesscolorlabs.com

 
Make a Peerless Travel Palette | VanillaArts.com

Here's my new travel kit

(warning: affiliate links ahead...)

First off, I needed a bag.

I know that sounds like putting the sleigh before the horse but because I knew the palette could be any size, I figured I'd find a great carrying case and then create the perfect palette to fit.

I found this bag on Amazon. If it came in red, I'd declare it utterly perfect. The pockets are deep, it has pencil & brush storage up front, and these handy little flaps to keep your inside stuff inside.

Make a Peerless Travel Palette | VanillaArts.com

The best part about this bag is something I didn't realize until Mr. Fed-Ex dropped it off on my doorstop- this bag has a hard board backing, sewn inside the back panel.

Once I'm on location and have emptied out my bag, the bag can lay on my lap as a mini-desk!

What's perfecter than perfect?

Oh, if only it came in red...


Next up, Peerless Watercolors!

There are lots of portable watercolor kits on the market. I do own and love my Winsor Newton watercolor makers, but I do not like juggling multiple markers in one hand while I paint with the other.

And yes, the practical part of me thought about buying a small empty travel palette. Because I use tube watercolors, it would have been very easy (and economical) to simply fill a smaller travel palette with my favorite watercolor paints.

But as I said earlier, I'm in a rut and doing the same ol' things with my same ol' stuff (only outdoors) really wasn't jingling my bells. So I ordered a 60 (they now have 80!) color set of Peerless Watercolor swatches.

Make a Peerless Travel Palette | VanillaArts.com

Peerless swatches are little cards embedded with transparent and vibrant watercolor. They work just like the watercolor coloring books we had growing up. Simply touch a card with a wet paintbrush to rehydrate the color, then paint your project. Because the color is intense and concentrated, you don't need to carry around a big swatch.

The problem with Peerless cards is that they arrive like a deck of cards... NOT very travel friendly. I Googled up a storm to see how other crafters were storing their Peerless. Most people are using photo albums with 2-6 colors per page. With 60 colors, that means lots of page flipping and wet swatches touching each other and generally getting nasty. Oh my sweet heavens, spare me that kind of color contamination!

I also wanted a white mixing surface. I almost never use a color straight up as is.


Hello Home Depot!

Make a Peerless Travel Palette | VanillaArts.com

This is corrugated PVC plastic. You'll find it in the same aisle as plexiglass and sheets of replacement glass for windows and picture frames. If you're not handy enough to enter the hallowed halls of Home Depot, Amazon has the same thing.

This stuff is sturdy, lightweight, and pretty inexpensive.  I paid $5.48 for a 18 x 24 inch rectangle. That was enough for one, three page travel palette (plus scraps). 


Make a Peerless Travel Palette | VanillaArts.com

Assembly:

I've used this plastic before for other projects and it cuts very easily with a craft knife (this is the best one ever, it doesn't roll away!!!).

I cut 3 panels at 7 x 10 inches. That's large enough to hold 30 swatches on a single page and it fits very easily into the bag. I could have gone slightly larger but then the math for the swatch sizes got weird.

artist + weird math = great angst

A T-square, a large self-healing cutting mat, and a brand new knife blade make this part of the job very easy and precise.

 
Make a Peerless Travel Palette | VanillaArts.com

The cut edges are not sharp but because I'll be handling this palette a lot, I wanted a more finished edge.

I ran a line of white electrical tape around all four sheets and burnished it down with a bone folder. The electrical tape may shift over time and with wear, so I'm not thrilled with this solution... but it works for now.

Plus the mitered edges makes my inner OCD patient smile.

 
Make a Peerless Travel Palette | VanillaArts.com

I used my Cinch machine to bind the three panels together with .75" wire. Cinch wire cuts easily with wire nippers.

The plastic sheets are 4mm which was a smidgen too thick to fit into the Cinch but I was able to squish just the end area with a bone folder. Then each compressed sheet slid in very easily.

I bound my palette along the short edge. That's another big difference between my palette and the other tutorials out there. I wanted long and narrow so that I can clip it closer to my project. I don't want the wind catching a tall palette like a sail when I'm outdoors.

 
Make a Peerless Travel Palette | VanillaArts.com

Here's where my palette starts to differ greatly from other internet tutorials.

Because I intend to mix colors and because I know the swatches will be damp when I close up my palette, I wanted space between the swatches and the mixing surface.

Even if not wet, these swatches can contaminate each other if they make contact color-to-color.

Plus, I suspect that wet swatches pressed up next to plastic means they'll dry really slowly and could grow mold or fungus over time. Ugh!

Make a Peerless Travel Palette | VanillaArts.com

Little adhesive backed vinyl bumper feet solve this problem and insure that even when folded, the swatches never touch the middle page mixing surface.

Here's an end shot of the closed palette. The pages all have a nice air gap.

Yes, it takes a hyper-critical perfectionist weirdo to think of these things...


Make a Peerless Travel Palette | VanillaArts.com

Here's the swatch cutting process.

Each of my swatches are 1/6 of a card, adhered to a sheet of watercolor paper with Tombow tape. When a swatch wears out, I'll rip it off and replace it with a new 1/6 piece.

I left room next to each swatch for the color name and a wash sample.

I used double sided Gorilla tape (super sticky stuff) to stick the entire card to the palette. One card on the inside of the front cover, one card on the inside of the back cover. The middle sheet (with the feet) is left blank as that will be my mixing surface.

Make a Peerless Travel Palette | VanillaArts.com

Warm colors on one page.

Cool colors on the other.  Yes, I'm missing a color. It was supposed to be 60 colors but they sent two Amethyst cards. I'm still not sure what color I'm missing...

Make a Peerless Travel Palette | VanillaArts.com

Here is my palette at work.

For smaller projects, I can tape the watercolor paper right to the mixing page. For outdoors, I will clip the entire palette to the side of my journal.

I'm not happy with the way the paint beads up in some areas, that makes mixing harder. I'll pull out some 3000 grit sandpaper later (super fine for polishing jewelry) and rough up the surface slightly. 

Make a Peerless Travel Palette | VanillaArts.com

Here's my travel bag loaded up with supplies.

I've got room for 2-3 journals here. Or I can throw in my case of Winsor & Newton Watercolor Markers.

Add some water to my flask and I'm all ready to go!

 
Make a Peerless Travel Palette | VanillaArts.com
Make a Peerless Watercolor swatch palette | VanillaArts.com

Yep, I even made a label for the front cover.

That's it, one travel palette chock-full of pretty Peerless Watercolors in a grab-'n-go messenger style bag.

I'm all set to go a-painting in the wilds of Michigan...

... if only it wasn't 42 degrees outside.