Tools On My Desk: Best Coloring Surfaces (Get better Copic Marker blends using the right board!)

What’s Underneath Your Coloring Project?
We spend oodles of money on Copic Markers and tons of time on classes, tutorials, and videos.
We’re constantly looking for the best blending papers.
And yet I’ll bet every time you color, you put a yucky piece of scrap paper under your marker project?
Stop! Protective blotter paper makes blending more difficult!
Let’s color on something better.
There’s a definite skill to blending Copic Markers smoothly. Unfortunately, the scrap paper you use to protect the desk from marker bleed-through makes blending harder than it has to be!
The Vanilla Team shares their favorite coloring surfaces which facilitate easy blending, saving ink and time.
I don’t want to ruin my desk!
It sounds like a good idea. You’re blending with Copic Markers. You don’t want them to bleed-though and leave ink on the table below, so you slide a sheet of scrap paper underneath your paper.
It’s supposed to absorb the excess ink right?
Except that’s the exact opposite of what you should be doing.

Scrap paper is absorbent.
It absorbs moisture from the paper as you color.
Absorbent paper decreases the length of time your ink stays wet.
The best blends happen when you keep the ink wet as long as possible.
The time when ink or paint stays wet is what artists call “open time”. Ink particles can only move (and thus blend) during open time. Ink can’t move and get all blendy if it’s not wet!
The longer the open time, the smoother your Copic blending will be.
Blotter paper shortens the open time by wicking away solvent from the backside of your paper.
The air above your paper dries it from the top and the blotter paper dries it from below.
Instead of adding an absorbent layer below, you should be coloring on a non-absorbent surface like glass, acrylic, or melamine. You’ll immediately notice your ink stays wet longer and the blends look smoother.
You’ll also use less ink because if a blend happens right the first time, you don’t need to double back and add a second coat!
Ready for a better coloring surface?
Let’s look at the Vanilla Team’s favorite blend enhancing boards, platforms, and surfaces. Some are permanent, some are portable, but all keep the ink wet longer to give you the best blends possible.
But first, here are a few other helpful Vanilla reads:
Pssttt… while we’re on the subject of coloring on non-porous surfaces…
Because we’re ditching the scrap-paper layer, surface care and maintenance is now more important.
Your glass or acrylic will collect little bits of ink that can transfer from one project to the next. To eliminate the transfer risk, simply wipe it clean after each use with a baby wipe or a cloth dampened with rubbing alcohol.

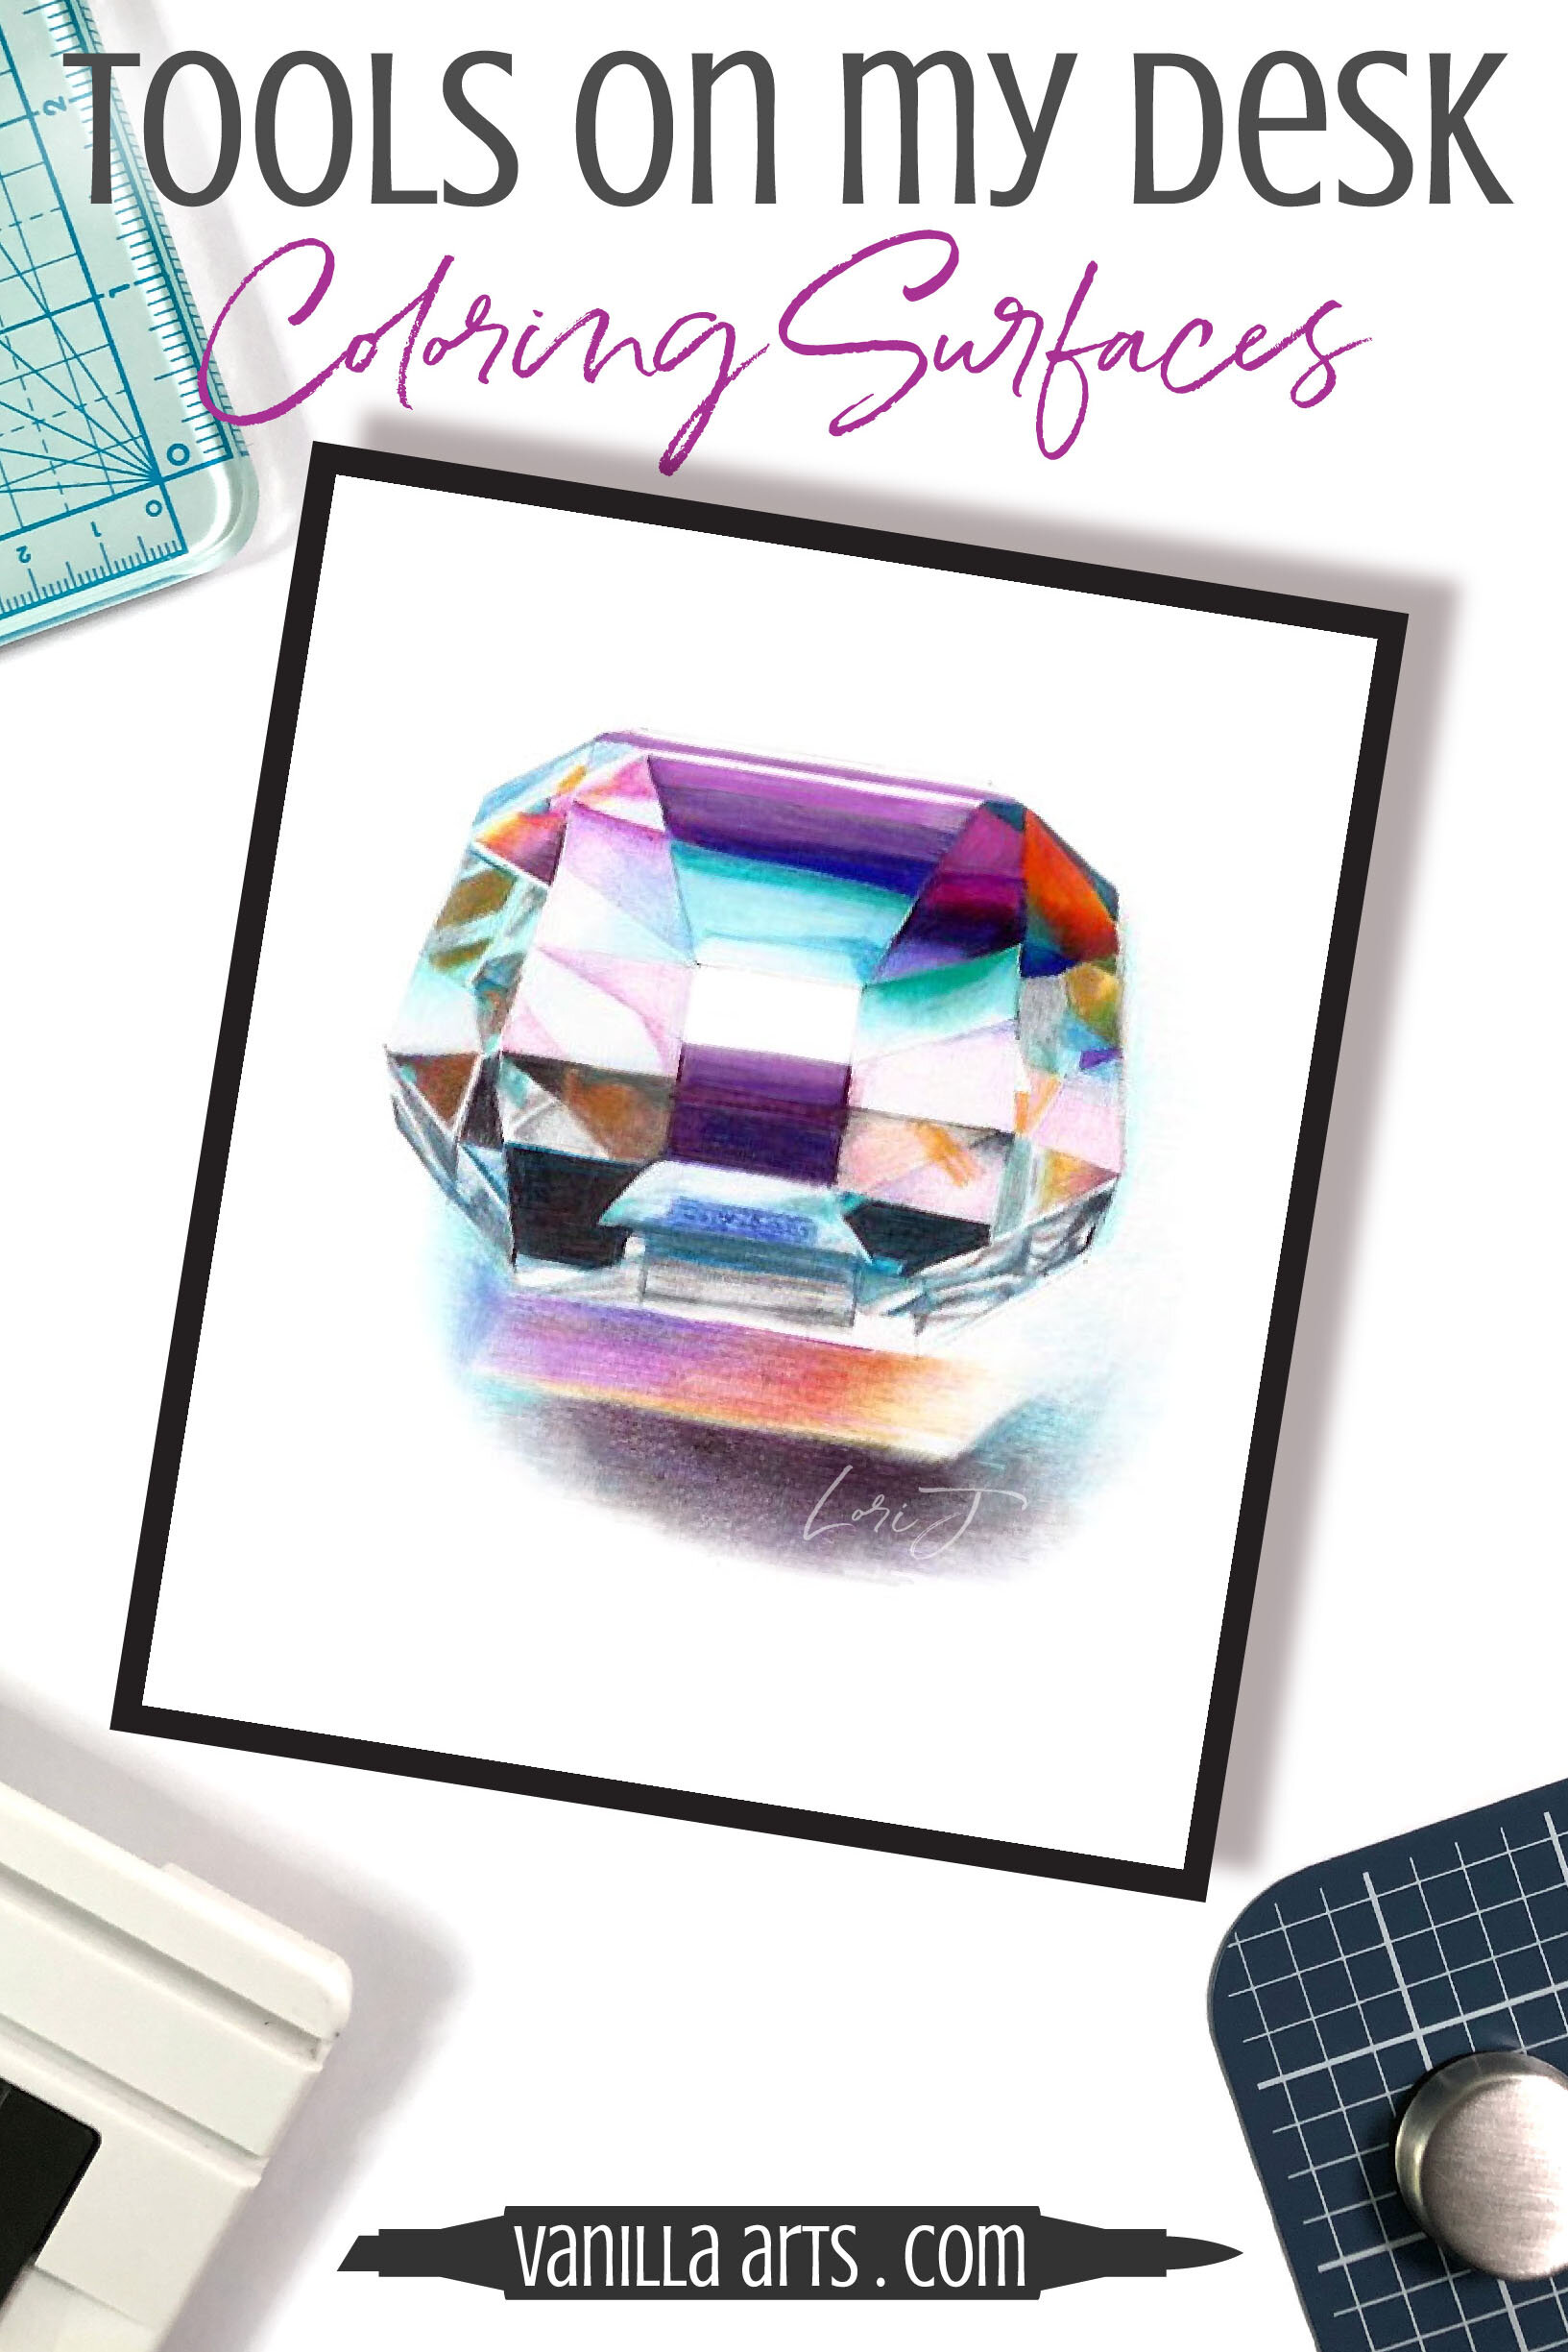
Dazzling Color
Lori J. is one of our favorite Vanilla Arts students. She’s such a supportive sweetheart but she’s also an inspiration! She frequently tackles new artist line-drawings from all over the internet, switching them up to color them in her own style.
Lori found this Sparkling Gem tutorial and line-drawing by Ummar Fadil in the 2019 issue of Colored Pencil Magazine. It was written for colored pencil on gray paper but Lori switched it up to use Copic Markers and X-Press It Blending Card.
For Lori’s mixed media version, the larger and more vibrant facets are Prismacolor over Copic Marker. Then as the spaces got smaller, Lori switched to pencil only. It’s a beautiful experiment and her blend of the two mediums is seamless!
Lori takes individual Workshop classes at Vanilla Arts, including:
The rest of this article contains affiliate links to trusted retailers like Dick Blick and Amazon.
Vanilla Arts Company is a participant in the Amazon Services LLC Associates Program, an affiliate advertising program designed to provide a means for use to earn fees by linking to Amazon.com.
The Vanilla Team’s Favorites—
It was such a simple question, “Hey team, what are your favorite coloring boards?”
The resulting text chat was a mile long. We all use 2-3 different surfaces and everyone was convinced they had the best.
Why so many boards? Versatility, of course! If we’re coloring a small project (a card image) we can get by with a smaller surface. When traveling, we go portable. And some of us have studio boards that never leave the desktop.
Best Surfaces for Copic Marker and/or Colored Pencil:
1. Beveled Glass: Amy purchased a pre-cut piece of beveled glass to sit on her desktop. She loves it and says it’s the perfect easy-clean surface for Copic Marker, paint, glue, or anything messy.
Amy bought her glass sheet at Hobby Lobby, they come in several standard sizes and you can’t beat the joy of using a 40% off coupon! She has seen similar bevelled glass tops at Ikea. If your desk is a non-standard size, contact your local glass shop (they’re often listed as automotive glass suppliers or window glass replacement suppliers). They can cut and polish your idea size and many can even add a bevel or bull-nose edge
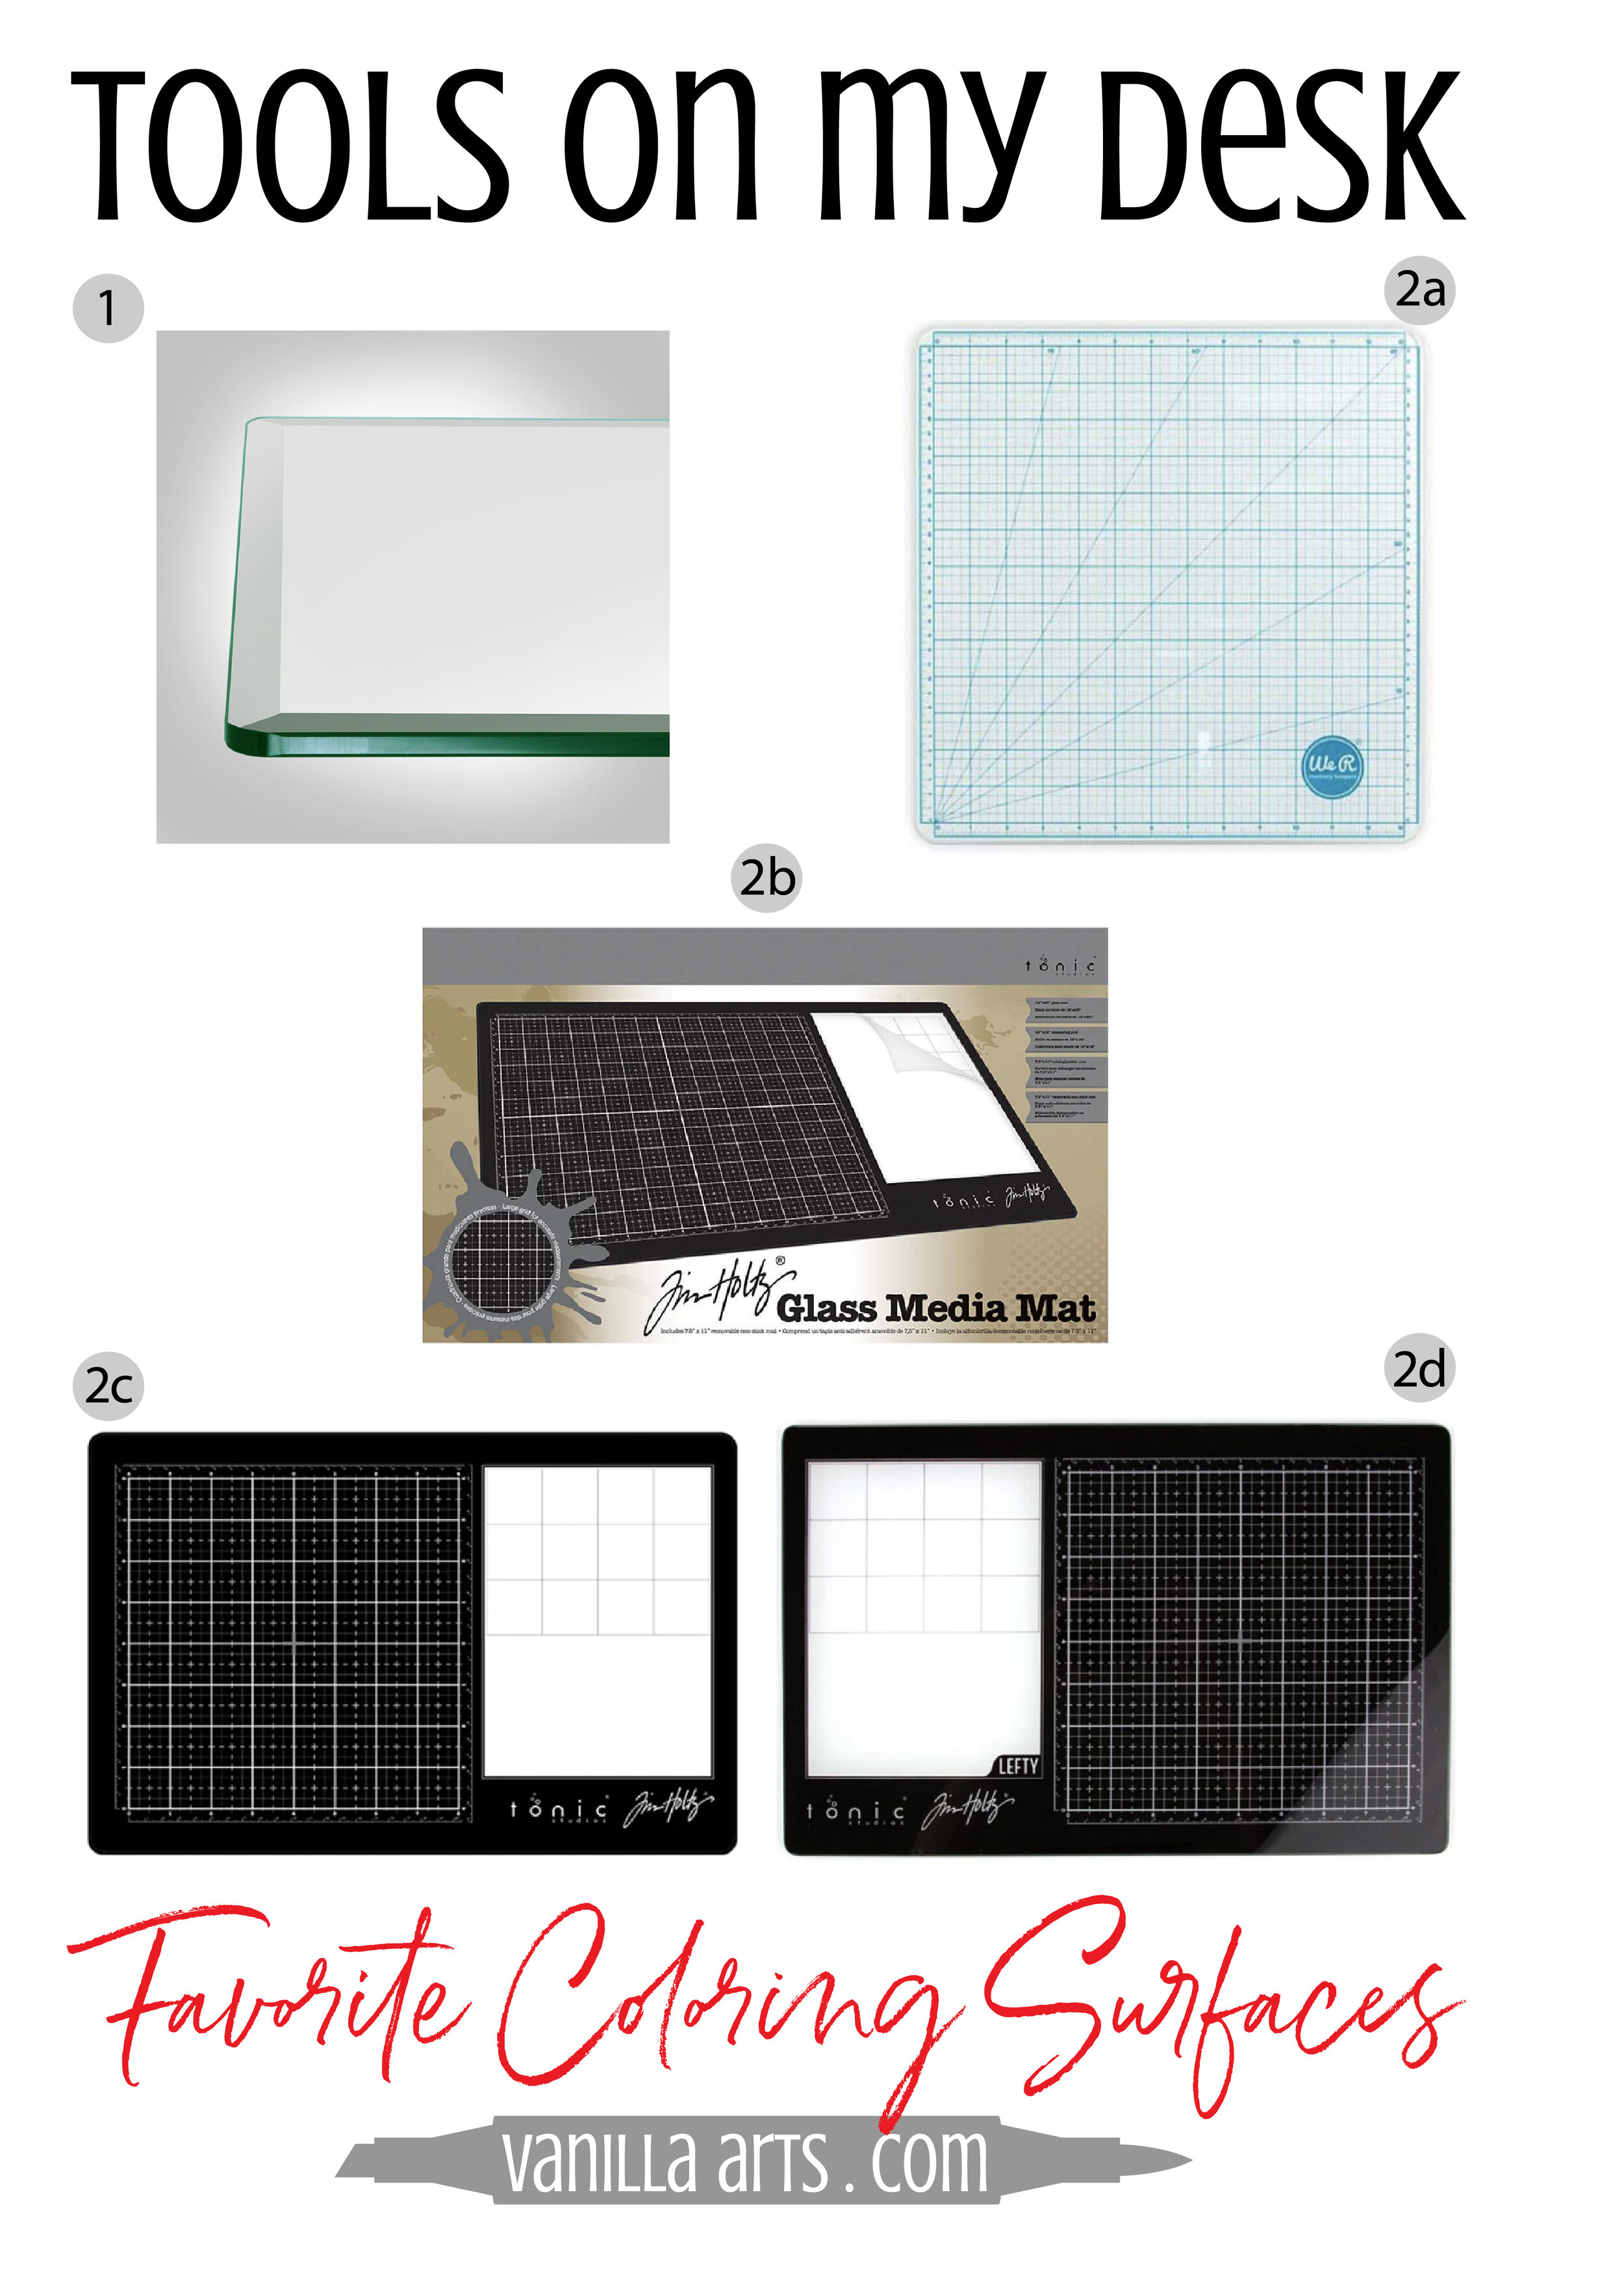
2. Glass Craft/Cutting Mat: Amy works at an L shaped desk and the side return is almost console sized. Because she didn’t want crud collecting between 2 separate sheets of glass, she opted to add just a glass cutting mat to the small desk. She uses the 13x13” glass cutting mat (a). Several team members also love the Tim Holtz Glass Media Mat in either the large (b) or small (c) version. Amy is a lefty, so she also owns the left handed craft mat (d).
3. Magnetic Self Healing Cutting Board: We have several students who work on a slanted drafting table. Many prefer a magnetic surface and use cute magnets to keep projects from sliding down.
4. Die Cut Machine Acrylic Cutting Pads: If you’re coloring small projects, here’s something most of you already own! These are a great size and non-porous. Stash one in your travel bag, just in case! The only catch is that it must be a new, smooth, and unwarped pad. If you’ve used it for cutting, it has slices and divots that could be transferred to your coloring. Amy likes the these pads in Blueberry because they’re easy to see. She’s left several clear pads behind in classrooms, those darned invisible shims!
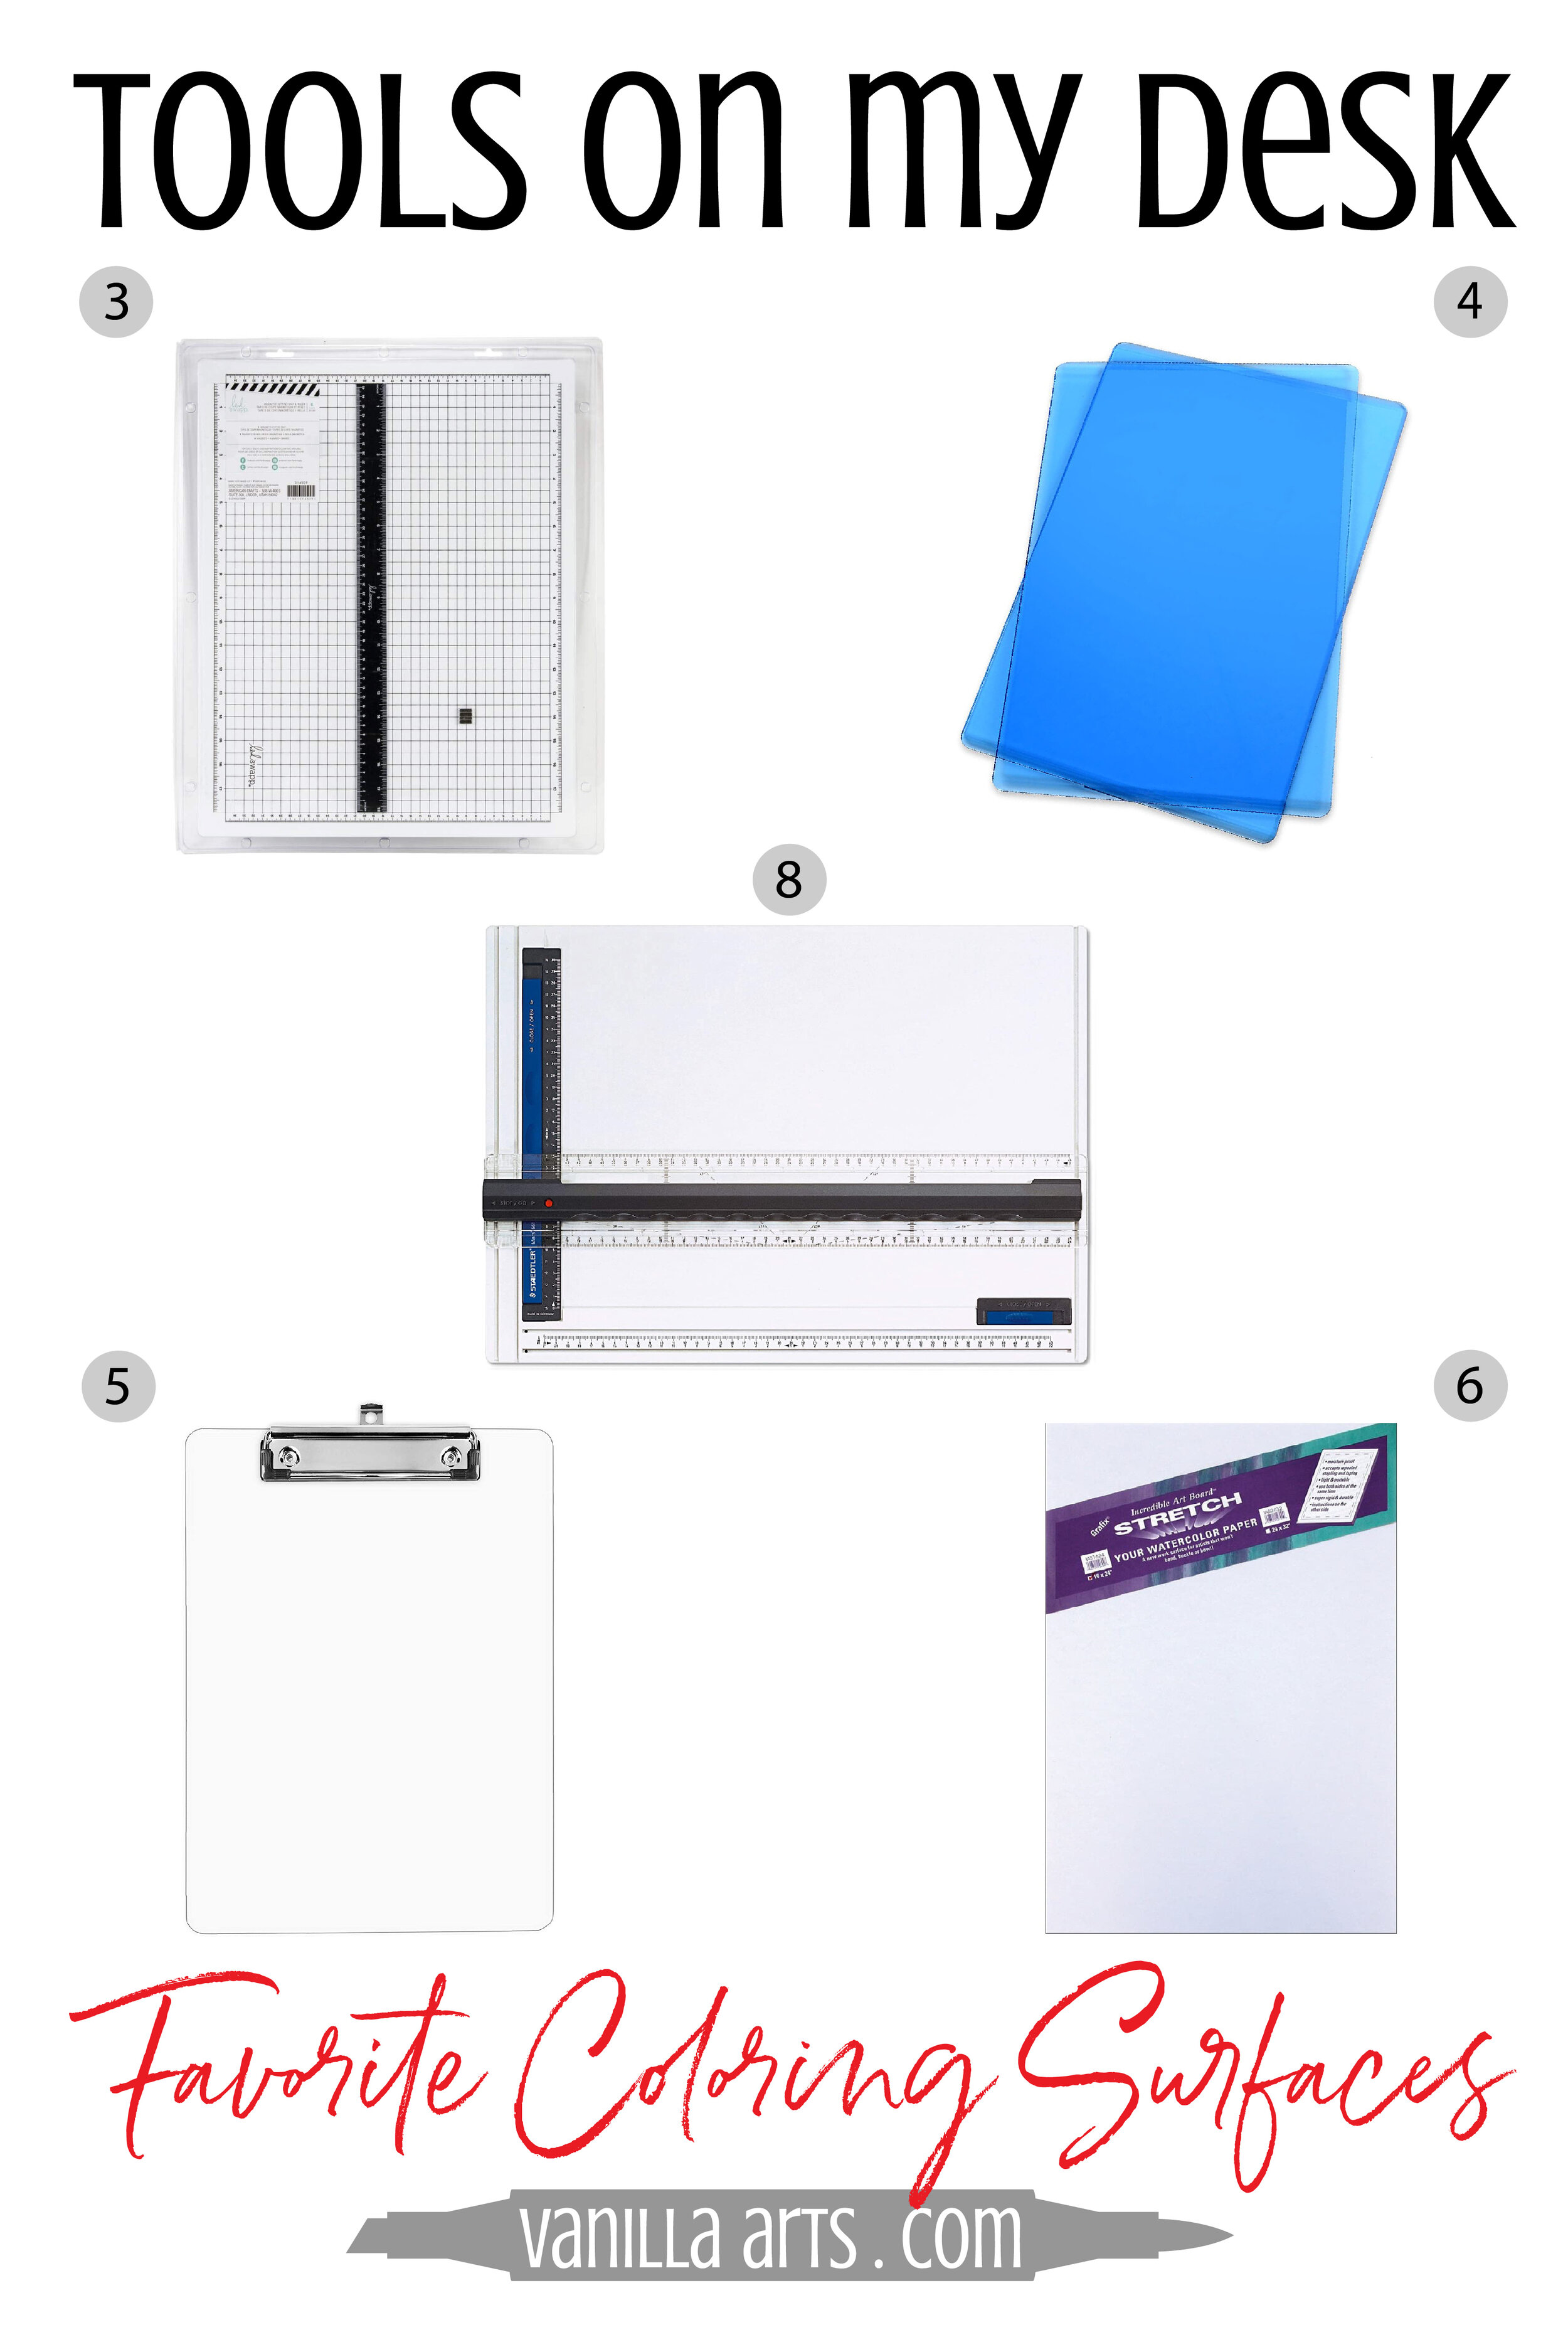
5. Acrylic Clipboard: These are inexpensive coloring surfaces that work well for any project smaller than 8 ½” x 11”. Amy teaches coloring classes with an acrylic clipboard and Kathy uses one at home when she is doing a project that requires a lot of rotating. She likes to use the clip of the board to rotate her project when coloring instead of reaching for the edges of the paper (she says she is known to get the edges dirty or dented otherwise).
6. Graphix Incredible Light-Weight Moisture Proof Art Board: Being lightweight makes this a great travelling surface; it’s basically moisture proof foam core board but a little sturdier and less likely to dent. In a pinch, if you only have standard foam core, try covering it with clear adhesive backed vinyl (i.e., Contact Paper) for a non-porous surface.
7. Picture Frame Glass: Kathy and several other Vanilla Arts local students actually color on a piece of glass from an unused picture frame. Hello, dollar store! Tape the sides of the glass for obvious safety reasons… and never forget that it’s glass! One student even put vinyl Contact Paper on the backside, to keep glass shards from scattering everywhere if she dropped it.
8. The Drafting Machine: The background surface that you see in Amy’s videos and livestreams is this white drawing board. Don’t get intimidated by “machine” in the name; it’s a durable plastic with no-skid rubber feet. Amy loves the built in rulers and t-square.
There you go!
Lots of different coloring surfaces in various price ranges. Most of them aren’t even technically art supplies.
Take a look around your art studio or craft room. Think about what’s smooth, moisture-proof, and non-porous. You may already have something that works.
If you’ve got a great alternative surface, please share it with us in the comments below!
Our Favorite Coloring Surfaces:

Vanilla Arts Company is a participant in the Amazon Services LLC Associates Program, an affiliate advertising program designed to provide a means for use to earn fees by linking to Amazon.com.