Depth & Dimension: Why pretty Copic Markers make your coloring look flat

Depth & Dimension: Why pretty Copic Markers make your coloring look flat

Cursed by a Rainbow?

Yep. All the pretty markers you own? They’re killing your ability to color dimensionally. Copic doesn’t make ugly markers because you won’t buy ugly markers. And that’s a problem because ugly color is essential for realism. It’s pretty darned hard to color real without real colored markers…

How to Blend Copic Markers: The #1 Secret to Smoother Blending

How to Blend Copic Markers: The #1 Secret to Smoother Blending

Can we solve your Copic Marker blending problems forever?

Yes we can, but to blend better, you’ll have to ditch all the magical thinking you currently use.

Smoother blends are not the product of using magical marker recipes. Smooth blends don’t happen when you apply magic techniques.

To improve your blending, you need to apply the science of solvent…

Color Smart: Create Focal Points (give your coloring projects the professional look!)

Color Smart: Create Focal Points (give your coloring projects the professional look!)

There’s more to better coloring than coloring better!

Technique can only take you so far.

You could be the best Copic Marker colorer on the face of the earth…

But if you lack presentation skills, no one will ever notice.

8 Tips for Coloring Easy Faces with Copic Markers & Colored Pencils

 
Don’t make coloring harder than it has to be. 8 tips for cute and friendly faces using Copic Marker and colored pencil. | VanillaArts.com | #copic #coloredpencil #coloringtips #adultcoloring #howtocolor


Pinchable cheeks & friendly smiles!

Skin and hair, skin and hair, skin and hair.

Ask any Copic colorer about skin and hair and you’ll get a gigantic eye roll. Everyone is on a quest for better skin and hair technique. Frankly, it feels like an impossible quest.

Skin and hair are hard to master.

Why?

Don’t make coloring harder than it has to be. 8 tips for cute and friendly faces using Copic Marker and colored pencil. | VanillaArts.com | #copic #coloredpencil #coloringtips #adultcoloring #howtocolor

For Copic users, I think the reason is two-fold.

First off, we all have faces and we all have hair. We all know exactly what real skin and real hair looks like.

So when we try to color skin and hair with Copic, it’s easy to see that our coloring just doesn’t look right.

We’re all perfectionists when it comes to faces and hair.

But here’s the other thing: I just googled “How to color skin with Copic” and got 6.6 million hits.

That’s a lot of skin coloring information!

When I started clicking on the various tutorials, articles, classes, and project samples in the search results, I noticed something—

The average face recipe is 3 Copic Markers for the basic flesh, add another 2 for the cheeks, maybe 2 for the lips. Then we slap on another 5 markers for eyes, brows, and hair.

A dozen markers for a human head? That’s nuts!

Especially when you consider that the average character stamp has a face of about 1 inch diameter or less!

That’s a lot of markers for a teensy-weensy area.

Who decided that faces should be fiddly, fussy, and downright complicated?

I’ll be honest: I really do not want to write about a topic that so many people have already written about ad infinitum… but I kind’a feel like I should.

Because coloring faces doesn’t have to be this hard!


8 Tips for coloring friendly faces with Copic Markers & colored pencils:

1. Friendly faces start with well-drawn stamps

I’m picky about the stamps I teach with, especially when it comes to human characters.

Don’t make coloring harder than it has to be. 8 tips for cute and friendly faces using Copic Marker and colored pencil. | VanillaArts.com | #copic #coloredpencil #coloringtips #adultcoloring #howtocolor

It pays to be picky.

Have you ever heard of The Uncanny Valley?

It’s a nerd thing.

Uncanny Valley is a theory in robotics but the concept also applies to animation and illustration.

The Uncanny Valley theory says that the more cartoonish a face is, the more friendly and appealing the character will be to viewers.

Conversely, the more realistic you try to make a face, the more the character repels your audience.

(If you’re wondering why it’s called an Uncanny VALLEY, there’s a very geeky graph which plots the dip in likeability versus realistic human features. The dip in the graph is literally a valley full of freaky looking faces.)

Basically, if you stay cartoonish, we’re all happy and no one gets creepy chills down their spine.

But if you shoot for realism and miss the mark, we’re all going to be totally weirded out.

The best example I can think of is Pixar’s “Tin Toy” animation.

Which character is cute? Which character looks like a rabid axe-murderer?

When you try to get realistic, bad things can happen.

That’s also true in the stamp world!

Don’t make coloring harder than it has to be. 8 tips for cute and friendly faces using Copic Marker and colored pencil. | VanillaArts.com | #copic #coloredpencil #coloringtips #adultcoloring #howtocolor

There are stamps which will never be cute because the stamp artist created something that falls smack-dab in the Uncanny Valley. It’s not your fault, the stamp was drawn creepy.

Amazing coloring can not rescue an Uncanny face!

Pick your character stamps with care. Then be cautious about the details you add. If the artist draws a face that’s close to the Uncanny tipping point, your coloring could put it over the edge.

Personally, I get fidgety when I look at those noseless children stamps. You know the brand I’m talking about. Poor little nose-free kids!

The stamp is bad enough but I get downright queasy when I see some of the noses that colorers add. A noseless face is something I can deal with but an Uncanny nose?

No, thank you.

So now that you know about Uncanniness, my first tip for coloring friendly faces is to really look at the stamp before you buy it.

Don’t get distracted by sweet sentiments or the long flowing hair. Instead, look very critically at the face. Make sure the artist isn’t too close to the Uncanny Valley.

And even though I know you’re here for advice on realistic coloring, if you want to increase your odds of ending up with a friendly face, stick with the more cartoonish stamps.

Sometimes, it’s better to color with un-realism.


2. Downsize your tools for coloring accuracy

Want to know why coloring faces with Copic is hard?

Because Copic nibs are too darned big for most faces!

You wouldn’t use the same brush to paint the house and apply eye shadow, would you?

Don’t make coloring harder than it has to be. 8 tips for cute and friendly faces using Copic Marker and colored pencil. | VanillaArts.com | #copic #coloredpencil #coloringtips #adultcoloring #howtocolor

But that’s exactly what you’re doing when you color card-sized faces using a Copic marker.

A Copic brush nib is at it’s best when you allow it to make wide swaths of generous color.

Sure, the brush nib has a tiny point on the end which in theory can make tiny lines…

But just because a Copic brush nib can make tiny marks doesn’t mean that it’s the best tool for making tiny marks.

Brush nibs are designed to be used from the side, not the point.

The Copic Super Brush Nib is the softest, springiest brush nib on the market today. It’s also the juiciest of all the brush nibs.

Which means when you go up “en pointe” to color small eyes, tiny noses, and mouths that are little more than a tiny line… If you’re trying to do that with just the point of a Copic brush nib? Well, you’ll end up fighting the marker the whole entire time. A brush nib really wants to flop over to be used on it’s side.

Why do you want to make coloring life harder?

Use your Copics for skin and basic head shaping. Then switch to a smaller tool for facial features and extra color.

Coloring eyes, eyebrows, noses, and lips is so much easier when you use a sharp colored pencil or a fine-liner technical pen!

There is no law that says your project must be 100% Copic!

Smart artists do not fight their tools. You will get more professional results and shed fewer tears using a finer pen or pencil.


3. Simplify the Copic recipe

There’s a big misconception out there in Copicland.

Copic colorers are trained to think in threes. If you’re going to color something, you grab three markers right?

A light, a medium, and a dark.

That’s the rule!

Don’t make coloring harder than it has to be. 8 tips for cute and friendly faces using Copic Marker and colored pencil. | VanillaArts.com | #copic #coloredpencil #coloringtips #adultcoloring #howtocolor

To go along with the rule, many colorers assume that when you start getting good with Copics, you’ll add more and more markers.

In many advanced classes and tutorials, the blending combos start to get seriously complicated.

Perhaps you feel like you’re getting your money’s worth if the instructor has you pull out 5 and 6 markers per object.

You’ve got your dark color, your dark-dark, and your medium color.

Then you highlight it with a light color and a light-light color. And maybe throw a white gel pen on top for good measure.

Yep, lot’sa markers.

That’s how the pros work!

Well… not in my studio.

Both of these angels were colored with two-marker blending combinations.

I used two on the face. Two on the hair. Two on the dress. Two on the brass items.

Does it look bad?

Does it look unprofessional?

If I hadn’t told you, would you have guessed that it was all two-marker combos?

NO.

Using two markers well is better than using six markers badly.

Most colorers have a hard enough time deciding where to put the dark marker.

If you can’t make that decision easily, how are you going to know which dark area gets the lighter-dark or the darker-dark? And if you’re still guessing where one highlight goes, how are you going to deal with another two highlight markers in your hand?

Use as few markers as you can get away with.


4. Stop collecting skin recipes

There are many ways to make fried chicken. 336 million ways if you believe Google search.

To make excellent fried chicken do you need to know all 336 million recipes?

No.

One recipe. Just one recipe is all you need to make great fried chicken.

Don’t make coloring harder than it has to be. 8 tips for cute and friendly faces using Copic Marker and colored pencil. | VanillaArts.com | #copic #coloredpencil #coloringtips #adultcoloring #howtocolor

Now skin is a little different. You can’t color every ethnicity with just one marker combination.

But you don’t need as many ethnic recipes as you think.

I have one caucasian recipe. I use it for blondes. I use it for brunettes. I use it for freckle-face gingers and black haired blue eyed cuties too. I also use the caucasian recipe for Chinese, Japanese, and other far east asians. While I haven’t colored anyone hispanic in a while, I think I could get away with this recipe for many lighter skin hispanics too.

It works.

Because I use this one recipe so often, I’m pretty darned good at blending it perfectly smooth.

I have a darker skin recipe for anyone who doesn’t fall into the pale face category. It works. And again, because I’ve practiced it a lot, I barely even think about blending.

Look, I know in this day and age, we want to recognize everyone. We want the whole rainbow of ethnicities to be represented.

But how many stamps do you have with 6 people standing side by side? Unless you’re going out of your way to color a bunch of people with slightly different skin tones, you simply do not need a vast collection of skin recipes.

Find an easy-blending skin recipe and stick with it.

You simply do not need 14 versions of the same skin color. Fourteen recipes means 13 ways to make a mistake.


5. Apply colored pencils like tasteful makeup

Okay guys, you can sit this tip out.

This one goes out to all the ladies.

Because it’s always the ladies who violate this rule. In all my years of teaching, I’ve NEVER had to correct a man about this.

It’s a girl thing, I guess.

So ladies, when you put your makeup, do you:

  • Draw a big pink circle on each cheek?

  • Dab 3 white polka-dot freckles over each pink circle?

  • Coat your lips and half your chin in fire-engine red and then draw two triangles on the top lip up to your nostrils?

  • Draw 4 black lines out of each eye, stretching from your eyeball to your eyebrow?

Don’t make coloring harder than it has to be. 8 tips for cute and friendly faces using Copic Marker and colored pencil. | VanillaArts.com | #copic #coloredpencil #coloringtips #adultcoloring #howtocolor

No?

Never?

Then why do you color faces like that?

Look, let’s be honest. Most of our character stamps are little girls. Sweet, innocent, good little girls.

So why do you tart them up?

Less is more when it comes to cheeks, lips, and eyes.

Subtle is always best.

Look in the mirror when you choose your markers and pencil colors.

I held colored pencils up to my naked lips until I found one that matched. That’s why I use PC1092 Nectar for all lips, both male and female. If I absolutely need the look of lipstick, I use PC926 Carmine Red or another almost-red that is far shy of a red-red.

If you wouldn’t wear it on your own face, don’t put it on your stamp.

Application rules apply too.

Don’t blush half her face, from the eye to the chin and back to the ear unless you want her to look like she’s dying of Scarlet Fever.

Blush your characters the same way you’d blush yourself. Find the apple of the cheek and apply a subtle hint of rosiness there.

Bonus tip: Wait until AFTER you’ve colored the hair and clothing to add blush and lip color to your characters. Once you’ve added darker hair and bright clothing colors surrounding the face, you’ll be better able to judge just how much color is needed to bring life to the face.


6. Heads are not basketballs!

Let’s do a test.

Hold your hand out flat and then hold that flat hand over your face, touching the tip of your nose.

What else is your hand touching?

Nothing. Just the tip of your nose, right?

That’s because your nose sticks out from your face.

We’re all aware that our noses stick out but have you ever really realized just how far? Your nose is farther out than your chin, farther out than your forehead.

That’s a normally shaped face.

Don’t make coloring harder than it has to be. 8 tips for cute and friendly faces using Copic Marker and colored pencil. | VanillaArts.com | #copic #coloredpencil #coloringtips #adultcoloring #howtocolor

Now use your flat hand to cover one eye.

Is your hand making contact with your eyeball?

No. Your hand is touching your cheekbone and your brow bone but your eye is sitting deep into a recessed eye socket.

That’s a normally shaped face.

So why don’t most tutorials mention this?

Huh. That’s so weird!

Most tutorials tell you to shade in from the sides of the face, making the head nice and rounded.

Okay, that’s a good place to start…

But that’s the end for most tutorials. Round the face and you’re supposedly done.

Which leaves you with basketball heads.

In anatomy drawing classes, we spend a lot of time observing the various planes of the human head. Portrait artists excel at noticing the subtle differences in those planes and shapes; the whole trick to creating a likeness is to capture the unique planes of a person’s head.

Now I’m not suggesting that you take several semesters of human anatomy drawing to color a simple stamp but I would point out that it’s not too hard to carve basic facial features.

Remember what your flat hand touched? The tip of the nose, the brow bone, and the cheekbone? Those areas should be light and bright without shading or dark color on them.

And the areas you could not feel with your flat hand? The eye sockets. The hollows below the cheekbone. Those are candidate areas for some shade.

Try the flat hand test on your lip & chin area. What areas should be light and which recesses should be dark?

Bonus points for anyone who notices that the upper and lower lips are on two different planes!

Basic anatomy is not hard, you’ve got a face right at your fingertips as a master reference. And wow, breaking up the face into basic planes is a gigantic improvement over a basketball head!

 
Don’t make coloring harder than it has to be. 8 tips for cute and friendly faces using Copic Marker and colored pencil. | VanillaArts.com | #copic #coloredpencil #coloringtips #adultcoloring #howtocolor

7. The eyes tell a story

Eyes are so important that I wrote a whole blog article here about coloring eyes.

Eyes can make or break an image.

Eyes are more important than color palette, more important than skin blending, more important than texture or any other element we add to a stamp image…

If you screw up the eyes, you pretty-much ruin the face.

That’s why I always color the face on an image as soon as possible. Right after I basecoat the skin, I start the eyes.

I don’t want to invest 90 minutes coloring the background, the clothing, the hair, and all the other little elements but then mess up the face.

If eyes don’t work, the face doesn’t work. And if the face doesn’t work, the entire image doesn’t work.

Eyes are the most important part of the whole entire image. Give them their proper due. Get them in correctly and do it early.

And if I mess up the eyes?

I scrap the entire project and start over.

They’re THAT important.


8. Eyelashes are not the key to cuteness or beauty

I hinted at this earlier. Remember when we talked about tasteful makeup?

Let me tell you what I see almost every student do.

And I’m not kidding, I can probably count on one hand the people who haven’t done this at least once.

You’re coloring along and everything is looking great.

Then you get to the eyes and you manage to get both eye-dots down, the same size, in the right spots… everything is looking great…

Don’t make coloring harder than it has to be. 8 tips for cute and friendly faces using Copic Marker and colored pencil. | VanillaArts.com | #copic #coloredpencil #coloringtips #adultcoloring #howtocolor

But then you add eyelashes.

Why?

Oh why oh why ohwhyohwhy do so many colorers do this???

I’m mystified as to why most people are programmed to add three lines coming out of each eye.

And actually, you’re kind’a lucky if you’re a three-line kind of person.

Some people add 5 to 10 lines!

What’s wrong with drawing eyelashes?

Well, let me ask:

How big is the eye you just colored?

Not very big, right?

Now how big is the eyelash you just drew compared to the eye?

Oh.

Okay, yeah.

Get it now?

I know you think you’ll make the character cute if you add eyelashes, but unless you step down to a .00000001 sized micro-pen, you’re not actually drawing anything that looks like real eyelashes.

Eyelashes are light and wispy. You can barely even see individual eyelashes on an 8x10 inch portrait.

Unless someone is wearing extravagant falsies or unless their face is about three inches from your face, we don’t really see individual lashes in real life!

So when you draw a line-line-line mark out of each eye on a quarter-fold card sized stamp, it does NOT look like eyelashes.

Stop doing that!

You are not adding beauty, you’re messing it up.


Bonus Tip: There will be demons

I warn all my students.

I warn them in every single face-coloring class, everyone from beginners through geniuses.

You will make ugliness.

At some point you are going to color a face so hideous and malformed that just the memory of it makes you think twice before getting up to go to the bathroom at night.

There’s no getting around it.

Monsters happen.

Even professional artists with tons of training and practice, occasionally give birth to wicked little critters that look like they’ll suck your soul out of your left nostril if it gets too close.

It happens.

Something goes wrong with the eyes, or the shading, or maybe the base drawing was off… it doesn’t matter. No matter how good you get, you’ll still make trolls every once in a while.

You’re not a no-good talentless hack. You’re normal.

Demon births keep you humble. They happen to all of us mortals.

Scrap the wee bastard and move on to another try.


Assignment:

What parts of the face make you nervous to color? What’s your biggest worry and have you figured out any tricks to make it easier? Share with us in the comment section!


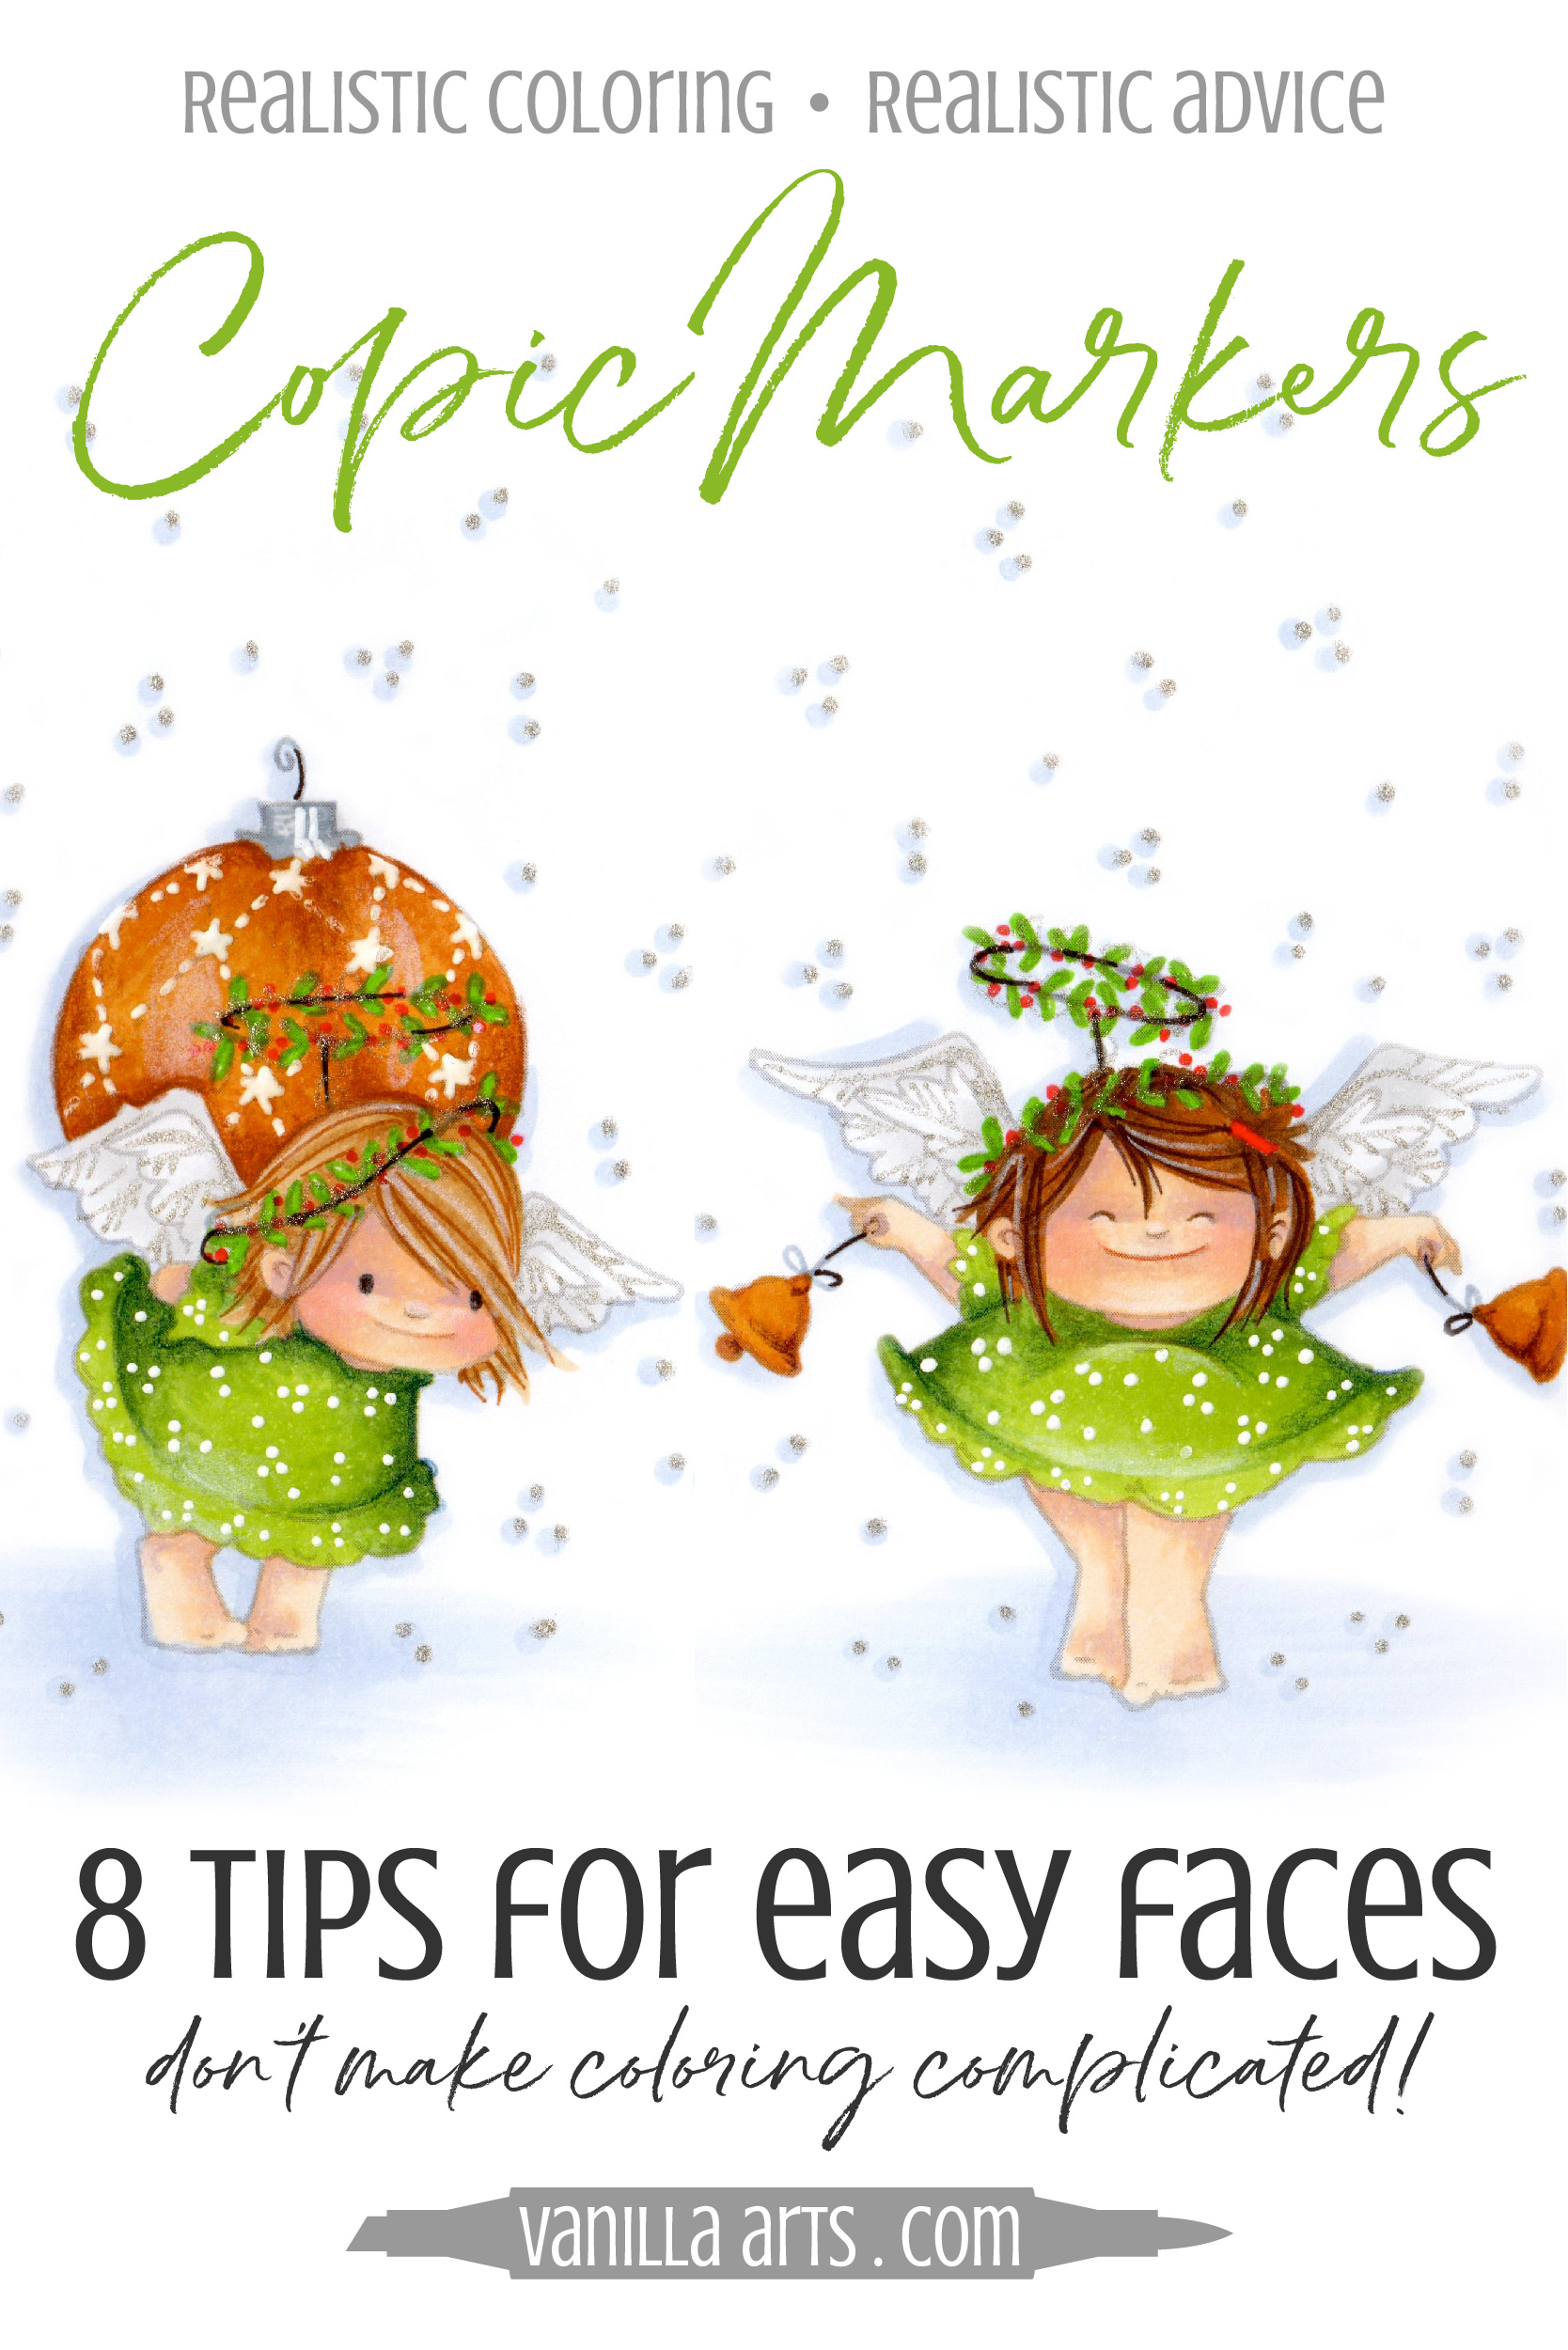
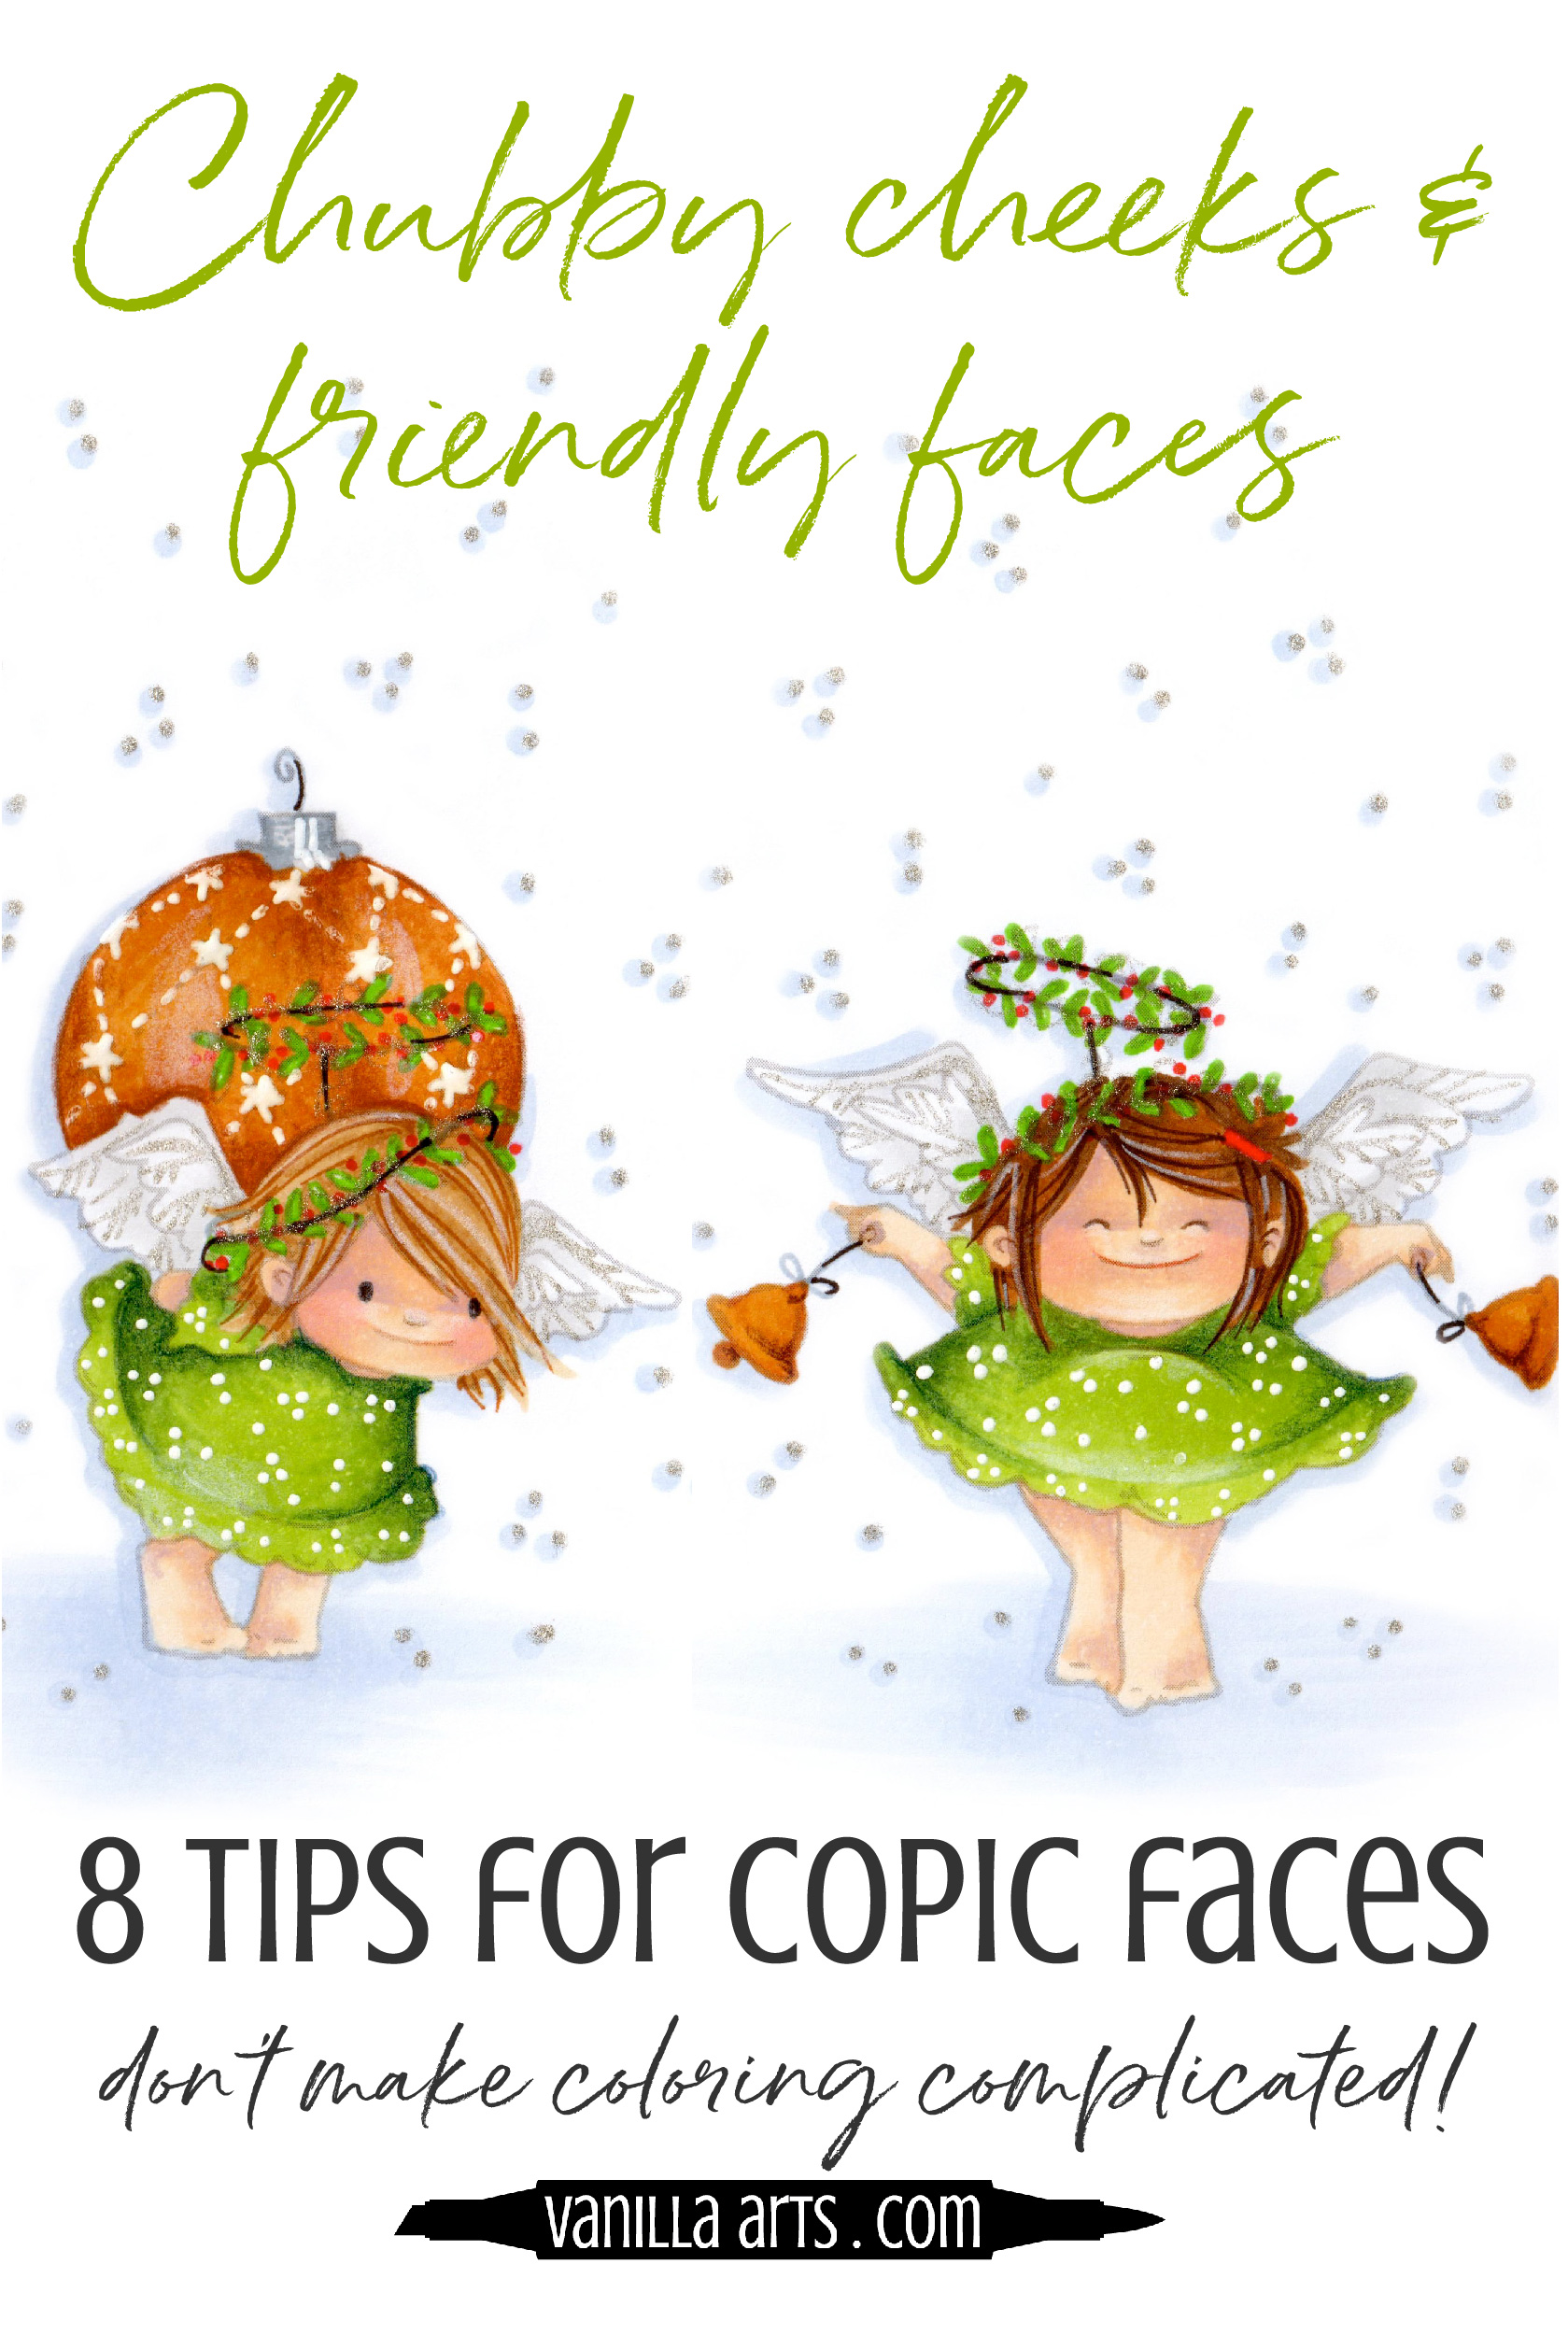
So to recap, my best tips for coloring faces:

1. Good coloring starts with a good stamp

The Uncanny Valley is real and it’s creepy!

2. Downsize your tools for accurate features

Copics can do a lot of things but tiny coloring isn’t one of them.

3. Don’t complicate the recipe

If you can get the job done with two markers, why add six more?

4. Find a few good recipes and stick to them

The better you know a blending combination, the better you’ll color with that combination.

5. Take it easy on the makeup

Use colored pencils for blush, lips, and other details. Use them sparingly for natural looking results.

6. No more basketball heads

You can do so much more than round-out the head!

7. It’s all about the eyes

Get the eyes in early. Get ‘em right or start over.

8. Skip the eyelashes, please

They’re only beautiful if they’re the correct size and scale.

9. And remember, it’s WHEN you make a demon, not IF

Even the pros make this mistake, all too often.


Color with me!

 Walk through my character coloring process in this FREE speed coloring demonstration at YouTube.

Christmas Angel uses Copic Markers, Staedtler Triplus Pens, and Prismacolor Soft Core Colored Pencils.

I demonstrate how to use simple 2 marker blending combinations to color dynamic and dimensional images.

You’ll also receive the next issue of Vanilla Beans, a weekly 2-minute newsletter this Saturday. Vanilla Beans is full of handy information, coloring inspiration, and exclusive discounts.

Already subscribed to Vanilla Beans? No problem. Use the same email address so that you don’t get a double serving of Beans!

 
Signature.jpg

Select Supplies used in “Christmas Angel”

Vanilla Arts Company is a participant in the Amazon Services LLC Associates Program, an affiliate advertising program designed to provide a means for use to earn fees by linking to Amazon.com.


Hey colorers: What parts of the face make you the most nervous? How do you get over the fear of coloring faces?

Share it with us in the comments below. Your observations can help us all color friendlier faces!