Why is Art Paper Measured in Pounds?

 
Understanding the weight measurement of paper | VanillaArts.com


Art paper is pretty confusing.

My students will often hear me rattle off poundages, especially when we're working on watercolor paper or illustration board.

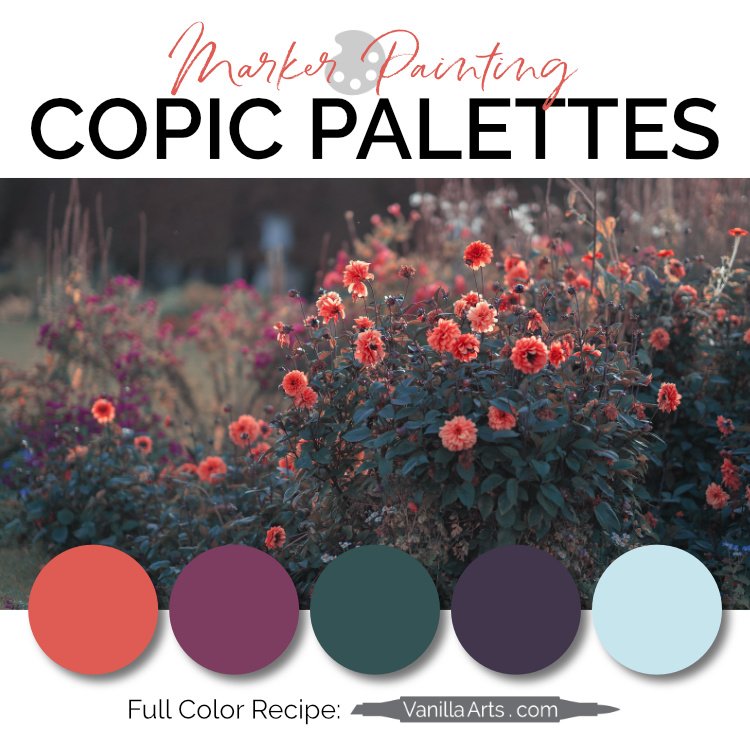
We're working today on 100 pound Bristol but you can also do this on 140 pound watercolor. Don't buy the 300 pound stuff because that's a waste for this type of project. And hey, remember that X-Press it is maybe about 110 pounds and Gina K is definitely 120...

I'm sure I've said that exact paragraph more than once in class and reading it back, I now totally understand why they sometimes look at me like I just started speaking in ye Olde English.

But paper thickness is pretty important.

Watercolor, pastel, and colored pencil artists care a lot about paper quality. Thickness is one of many considerations they always look at. Cardmakers and digital stamp enthusiasts need to be just as concerned about paper thickness- you want something thin enough to fit through your printer but not so thin that the final card feels chintzy and cheap.

Paper weight matters.

Understanding paper weight becomes especially important when you're ordering off the internet. It's pretty hard to judge your paper by feel when it's not right in front of you.


Why do we measure paper pounds (a unit of weight) when we really mean thickness?

Don't blame me, I didn't start this nonsense.

First, let's discuss a ream.

If you work in an office setting or you like to buy paper at Costco or Sam's club, you've most likely heard the term "a ream of paper". Basically, a ream is 500 sheets.

Now take a ream of paper and set it on a scale. Let's say your 500 sheets of paper weighs 100 pounds. That is 100 pound paper.

Great! So a ream of watercolor paper that weighs 300 pounds is called 300 pound paper?

Yes.

And 140 pound pastel paper weighs 140 pounds? And it's about 1/2 as thick as the 300 pound pastel paper?

Yep and yep again. You're doing good.

And 70 pound bond paper is half the thickness of 140 lb. pastel paper?

Nope.

Huh?


Here's where it gets confusing.

Not all reams are created equally.

Some reams of paper are cut to 22 x 30 inches. And some reams are cut to 24 x 36. And some come off a really big giant roll and they kinda guess at what a ream would weigh. And if it's a handmade paper, a ream is whatever dimensions come off their custom apparatus. Reams are different from factory to factory.

And notice it isn't 500 sheets of 11 x 14 paper we're looking at, the ream is only seen at the factory, before they cut it down into their preferred standardized sales size. Good luck finding the information on what size ream your favorite paper company uses.

Yeah, I warned you. You should be scratching your head now.

But let us proceed anyway...

The dimensional size of a ream greatly affects the weight of 500 sheets. It's that whole "I can fit a pound of chocolate-walnut fudge in my purse but it takes a wheelbarrow to carry a pound of feathers" kind of problem.

I don't know if you often have that problem, maybe it's just me...

So anyway, unless you're comparing 2 sheets that were both cut to the same size for the original ream, you're not comparing apples to apples. It's more like comparing apples to gorillas. Paper pound weights are not a like for like comparison.


Then why don't we have a better measurement system?

Well, we do. But it's not always printed on the label and frankly, most Americans ignore it because it looks all foreign and full of metric magical hoo-ha nonsense that many of us try really hard to avoid...

Look for "grams per square meter", "g/m2" or "gsm".

This means they cut the paper to 1 meter by 1 meter before weighing it. That 1 meter square is always the same physical size whether we're talking about super thick watercolor paper or the thinnest of tracing paper. A thick paper will always have a heavier gram weight measurement than a thinner paper and we're always talking about the same standard dimensions, no matter who made it.

So bond paper that is listed as 60gsm is 1/2 the thickness of a cardstock weighing 120gsm. It's 1/4 the thickness of 240gsm Bristol board.

Let me stress, we're still not talking about somebody picking up a sheet of paper and using a set of micro-calipers to actually measure how thick the paper physically is, but at least we're doing apples to apples minus the weird guy in a gorilla suit.

So if we could just get all paper distributors and all retailers to list the gsm, we'd be really cookin'. As it is now, when the gsm isn't listed on a store's website, I click on the zoom of the product package photo. Sometimes that'll show you the mysterious metric information that's missing from the specs section. You can also check the paper manufacturer, they frequently list full specifications online now.

And truely, gsm listings are way more common now than they were 15 years ago; so it is getting better. Slowly.


Have you found a confusing art term?

Let me know and we'll try to iron that out in a future blog post.

Now go impress your friends and family with your new-found paper knowledge. You'll be the hit at the next family picnic, I guarantee it!

Sticky Tack: The Gentle Eraser for Colored Pencil

 
Use sticky tack to correct colored pencil | VanillaArts.com


“Primum non nocere”: First, do no harm

Abrasive Detail Erasers- Total Overkill | VanillaArts.com

This is something that runs through my head when a student pulls out one of these to correct a colored pencil mistake.

This is a detail eraser. It is designed to scrub away ink or grease mistakes from office grade, smooth paper. It is a very firm eraser which allows it to be sharpened to a fine point for small areas. It's also highly abrasive which means it rubs away more than just the mistake, it takes off the top layer of stained paper fibers with it.

But for soft, waxy colored pencil on delicately toothy paper?

You might as well use a hand grenade.

If you've got one of these weapons of mass destruction in your art kit, go put it back in the office drawer, where it belongs.

Right now.

I'll wait here.

I've been using colored pencils on an almost daily basis for over 25 years. I can honestly say that I've never encountered a situation where a mistake was so bad that it required stripping off the entire top surface of my paper.

Yes, I've made serious mistakes, but nothing that ever required the use of a hand grenade.


Colored pencils work best on toothy paper

Toothy paper for colored pencil | VanillaArts.com

Tooth is texture; tiny little micro mountains that grab and hold colored pencil pigment.

If you've tried using colored pencil on slick paper, you know how hard it is to get it to lay down smooth and not rub off. It's like trying to spread peanut butter on freshly Zambonied ice. You can try but hey, good luck with that.

Paper quality is a big deal; toothy paper is something colored pencil artists pay extra for.And that hand grenade eraser up there? It'll kill your paper.


Respect the tooth

Now I'm going to assume that most stamp colorers are using some form of office grade cardstock for colored pencil. There's nothing wrong with that, not all projects deserve special paper.

But that doesn't mean that you can ignore the tooth. In fact, because you're using only moderately textured paper, you need to protect the limited tooth EVEN MORE than someone working on generously toothed, premium cold press paper.

Abrasive erasers wear the paper smooth. The more you rub, the less tooth survives. So yes, you may have removed the offending mistake but when you reapply color, that smoothed area will not grab the colored pencil the way it did before. If you really damage the paper, you'll have a shiny zone that stands out to viewers.

So when you make the inevitable mistake and you reach for an eraser, remember Primum non nocere- first do no harm.

Start with the most gentle eraser you can find. If that doesn't lift the error, then bring out a slightly bigger gun. Do not start with a Tyrannosaurus Rex eraser; start with a soft, fluffy, white bunny rabbit.


Sticky Tack is the fluffy bunny of the eraser world

Lift mistakes with sticky tack | VanillaArts.com

Sticky tack?

Yep. Poster putty. The stuff that your fourth grade teacher used to put "Hang in There" and "Give a Hoot, Don't Polute" up on the class room walls.

This stuff.

Duck is a good brand, so is Scotch Brand. You want the white kind, not the softer blue or green versions.

Pull off one  strip (there's usually 8-12 strips per package). A single strip is enough to last for at least 6 months. You'll need a small airtight container (film canister sized) to hold your working piece. Pop the rest of the package into a zip lock bag for longer term storage.


Sticky Tack is Not a Kneaded Eraser Substitute

Gently lift errors with sticky tack | VanillaArts.com

Gray kneaded erasers are for working with charcoal, graphite, and chalky dry pastels. You drag gray erasers across the paper to gently lift powdery marks. Gray erasers are lightly abrasive and they are not sticky enough to lift stubborn and waxy pigments like colored pencil.

Sticky tack is lightly sticky. That's why it works. Use it the same way you used Silly Putty to lift up your favorite Sunday Comics.

  1. Soften and knead the sticky tack into a smooth, warm ball.

  2. Gently press into the surface of the mistake.

  3. The sticky tack will grab the paper; hold the paper down with one hand while gently peeling away the sticky tack with the other.

  4. Knead the residue into the eraser to create new clean surfaces.

  5. Repeat as necessary until you've lifted away the mistake.

Sticky tack lifts colored pencil without damaging the paper | VanillaArts.com

I know it sounds crazy but this stuff really works. Best of all, it doesn't damage the tooth of the paper the way rubbing erasers do.

The other benefit of this lift and remove method is that it eliminates transfer smudges. Let's face it, it's pretty easy to drag Prismacolor pigment into unwanted areas. I wear a drawing glove to prevent hand dragging marks. Rubbing erasers often pull color into your cleaning area... which then requires more rubbing. It's a vicious cycle.

Lifting mistakes straight upward eliminates the potential for eraser smudges.


When I make a mistake, I use the sticky tack eraser first

As I said, start with the fluffy bunny, not the T-Rex.

If the sticky tack can't remove the oops, move up to your white eraser. But give that sticky tack several tries first, because the white eraser will drag and transfer pigment.

But honestly, the sticky tack almost always removes enough of the pigment that I can go back and add the correct color.

Remember, you don't have to get down to naked paper in order to fix a mistake. Most Prismas are fairly opaque and can cover over much of the mistake.


Here's the rundown on sticky tack erasers:

Alternate Names-

Sticky tack, poster putty, sticky stuff, adhesive putty

Brands- 

Duck, Scotch... choose a quality WHITE putty. The dollar store stuff was gooey and left residue. The colored versions seem to be softer but less sticky. Make sure it's fresh and clean, the once-used stuff in your junk drawer may have collected grit.

Defining Features-

A soft putty that clings to waxy pigment enough to lift it away but will not damage the paper or leave a residue.

Best used on-

Wax based colored pencil marks and other media that sit on top of the paper surface. Will not work on liquids like ink or paint that absorb into paper fibers.

Price Range-

Very inexpensive. One package will run just a few dollars and provides enough for several years of daily use.

Available at-

Office supply stores, hardware stores, or similar aisles in any big-box retailer.


Sticky tack... who'da thunk?

Go get some today, your tooth will thank you for it.

Art tips and tools  VanillaArts.com

White Erasers: Your Best Friend for Colored Pencil Art

 
Best Tools for Paper Crafters- White Eraser | VanillaArts.com |   #copic #adultcoloring #howtocolor


Frustration takes the fun out of coloring!

And I suspect that much of the irritation we face during our crafting sessions is self imposed due to faulty or inappropriate tools and supplies.

Think about it - what's more fun? Going out for a Sunday drive in a Lamborghini or in an '87 Yugo with one flat tire?

Please don't tell me you're a Yugo fan...

The thing is, you don't really have to have the sports car to enjoy a pleasant drive. You can have quite an enjoyable time in many makes/models of car. But that trip in the Yugo is going to cause more than a few gray hairs before the adventure even starts. Sure, a 3 wheeled hatchback might make for awesome yard decor but it's not exactly road ready material.

When you grab the wrong tool for a crafting job, it's like choosing the Yugo over the Lamborghini, every single time.

Let's make our lives a little easier (and a little more enjoyable) by looking at good tools. Some will be expensive, others will be dirt cheap. The point is that they work well and will improve your coloring sessions.


White PVC Erasers are Important for Colored Pencil Art

 
White PVC Erasers are wonderful | VanillaArts.com
 

Forget about odes to Grecian urns, if I was even remotely poetical, I'd write an ode to white erasers. Whether in brick, stick, or pencil top form, Vinyl erasers are a modern miracle.

Even if you don't draw, you will use this eraser! When you measure, draw straight lines with a ruler, and especially when you're penciling in a detail to color later, this is the tool for you. It's also essential for colored pencil coloring.

It's a great all around eraser. I'll cover other erasers in future Tool Time articles but if you're only going to purchase one eraser, this is definitely the kind to get!


Alternate Names

PVC, Vinyl, Polymer, Poly, Plastic, Non-Abrasive, and Technical. These are all different descriptors for roughly the same thing.

By the way, my daughter has about 3,000 little novelty erasers shaped like hamburgers and strange Japanese hamsters. While these may be vinyl and some are even white, they are not what I'm talking about here.

Brands 

Staedtler, Pentel , Tombow, Campus, Lyra, Faber-Castell, Nayana ... these are just the top names, there are tons more. They're all slightly different and some work better than others, but I've never encountered a white polymer eraser that didn't do a good, scratch that, great job of erasing basic work marks.

Defining Features

This is a soft plastic, almost rubbery eraser which contains no abrasive pumice or grit. It feels smooth and buttery when rubbed against paper and it leaves a minimal amount of debris.

Best Used On

Excellent for graphite (pencil lead) in any hardness. Moderately effective on waxy colored pencil and firm chalk pencils. Excellent for finger and hand smudges that collect on the borders of your work.

If I need to erase something, this is the first eraser I try because it's gentle. I may end up moving to something more abrasive for stubborn marks, but I always begin the process with my white PVC eraser.

Styles

For years PVC erasers came in brick style only, usually with a cardboard sleeve which kept large bricks from cracking.  For greater control, try a stick version. White vinyl erasers are pretty standard on top quality technical pencils but I've also seen them on the disposable PaperMate level mechanical pencils. Artist-grade electric erasers use PVC erasers. The most recent development has been a micro sized PVC eraser in pen form, the Tombow Mono Zero eraser, which is excellent when working in small areas.

Note: there are also very similar PVC-Free white erasers on the market. For the record, that's the only white eraser that I've ever hated. It was oddly soft and it developed small cracks on the first use. I quit using it when large chunks started coming off, about 2-3 weeks into daily use.

Price Range

Very inexpensive. Small bricks and sticks are often found in value multipacks for under $1 per eraser. The Tombow Mono Zero eraser is around $5.

Availability

Very widely available. Art stores, craft stores, office supply stores, and in the office supply area of many big-box retail chain stores. Online at numerous retailers.


Pink Erasers Will Damage Your Artwork

 
PVC vs Pink Erasers | VanillaArts.com
 

Both Samples are #2 Ticonderoga pencil cross hatching, firm pressure on vellum surface Bristol Board.

The left has been erased by a fresh Pentel "Clic Eraser" #ZE22 PVC eraser (the purple one shown above)

The right is erased using the same Ticonderoga #2's factory installed pink eraser. Eraser is fresh, not hardened, and first time used.

Here's the deal with white erasers, not only do they erase pencil marks better than the old-school style pink eraser but because they're non-abrasive, they leave the paper fibers relatively intact.

Don't get me wrong, EVERY eraser on the market will damage your paper to a certain extent but the less damage you cause with each erasure, the better. If you're someone who is heavy handed or you go back and erase your marks a lot, you most likely have noticed damage zones on your paper. These are areas where the Copic Marker doesn't absorb properly or where Prismacolor just won't stick. Using a PVC eraser will help to limit the number and severity of your damage zones.

PVC erasers definitely leave a slight sheen on the paper surface but that's nothing compared to the pink smudge left behind by the pink eraser. That pink residue won't scrape off, it's embedded into the paper and is at some angles, a very noticeable discoloration.


White PVC Erasers: Does brand matter?

I'm not terribly picky about my white eraser brand. Having said that, it should be clear that I'm not buying them at the dollar store. I tend to pick them up as impulse purchases at the art store, so I'm usually purchasing an established name brand in the mid-range price.

One thing I have noticed however is that some leave more carnage behind than others.

By carnage, I mean the funky residue that you have to sweep away.

Staedtler Plastic Grand Eraser | VanillaArts.com
Pentel Hi-Polymer PVC Eraser | VanillaArts.com

Staedtler's erasers leave the usual debris behind. The Pentel Hi-Polymer brand always forms just a few, long threads of residue. So Pentel leaves your desk area a little cleaner.

I had heard about Moo erasers from Nayana Co. when I was researching what to use for hand-carved stamps from erasers. So I picked up a two pack; they were very inexpensive.

Not only does Moo leave A LOT of carnage all over your paper, but when you touch the eraser with your fingers, you can rub even more off. It's not that it's gritty, dry, or funky feeling - it just constantly sheds. So while Moo works fine, I've decided not to buy that brand again because I think excessive shedding = a shorter life span for the eraser.

Moo PVC Eraser | VanillaArts.com
Mod Podge brush for sweeping away debris | VanillaArts.com

And by the way, this is what I use to sweep away the eraser carnage:

It's a 2.5" soft Mod Podge Brush. It's supposed to be used as an applicator but it's so soft and fuzzy that it's perfect for brushing aside eraser residue or the dust generated by Prismacolor pencils.

I wish it had a hole in it so that I could hang it up, but other than that, I love this little guy.

Do not use your hand to sweep debris aside. You'll either transfer body oil to the paper or you'll accidentally drag the debris hard enough to leave a skid mark. If you don't have a brush, try to blow it away. The key is to be gentle!

And yes, I did have a really nice professional, expensive drafting brush which I used frequently until it mysteriously disappeared from my desk one day. I found it in the kitty litter box. I'm not sure why my husband or my 5 year old put it there but I'm sure they had a really good reason.

Needless to say, I do not have a really nice professional, expensive drafting brush anymore.


PVC erasers require care

Dingy PVC Eraser | VanillaArts.com

White erasers tend to hold on to the graphite or colored pencil that you have erased. This is a problem because you can accidentally transfer color to other areas of your art.

This is what graphite buildup looks like. It also holds on to Prismacolor especially well.

Cleaning it is simple - no special tools required.

Rub the eraser clean on your pants. Jeans work best but here I am wearing a pair of khaki pants. It won't transfer to material, your pants are completely safe.

If you're not brave enough to use your pants (or maybe you're not wearing any...) find a washcloth or keep a scrap piece of fabric in your art supply box.

Get into the habit of always cleaning it off before use. That prevents the oopsies.

 
Cleaning a PVC Eraser | VanillaArts.com
A Cleaned PVC Eraser | VanillaArts.com
 

And by the way, I never clean mine off this well, a couple swipes to clear the area I intend to use is usually what I do. In fact the original dirty photo (blue background) is exactly how it normally looks, I swipe off the end before using, I never clean off the whole darned thing unless I'm taking a photo of it for the website.

White erasers - an all around, gentle tool that I use daily. Consider adding them to your tool box today.


View our recommended supplies here:


Artist Grade Supplies: Why Beginners Should Always Purchase the Best Materials

Artist Grade Supplies: Why Beginners Should Always Purchase the Best Materials

Buying Art Supplies for the Very First Time?

I’ve worked as a professional artist for over 25 years. I’ve taught Copic Marker and colored pencil classes for the last decade. But I wasn’t born an artist; I was a beginner once too.

I remember the early debates, “should I buy just a few really good items or should I get the big student set?”

Let’s talk about that today.