
Colored Pencil: Are you Heavy-Handed and Burnishing? Improve Your Coloring by Mastering Pressure Control

Do you always press hard with colored pencils?
And you just can’t lighten up?
Or maybe you feel like you have to automatically burnish everything you color?

I teach lots of colored pencil classes and after all these years, I can honestly say— pressure control is a universal problem.
Every colorer struggles with pencil pressure control issues.
Everyone.
It’s often a beginner thing but I frequently encounter people who have colored for years who still battle the pressure demon.
Actually “pressure control issue” is a bit misleading.
What we’re really talking about is that most people press too darned hard.
I wish I saw more too-soft problems than too-hard! Wimpy coloring is so much easier to solve!
Today, let’s explore your heavy-handedness and how to control pencil pressure for more professional looking results.
Are you heavy-handed with colored pencils? Hard pressure coloring is often the result of a bad pencil grip or poor instruction. Heavy burnishing is also overrated. A professional illustrator offers tips on pressure control to save money, improve your coloring, and work without pain or numbness.
But before we start…
If this is the first time you’re hearing about the importance of pressure control for colored pencils, you need to rethink how you’re currently learning to color.
If you’ve been coloring with colored pencils for more than five minutes and haven’t been exposed to the concept of pressure…
This is a problem.

Colored pencil pressure should be lesson #2, right after how not to stab your eye out.
Seriously, this is basic stuff.
If you’ve not heard about pencil pressure from the free videos, blog tutorials, or classes you’ve been taking— you’re not getting good quality information.
Can you imagine Driver’s Ed without anyone ever mentioning the brake pedal?
When you’re pressing hard and have no idea it’s a no-no, you’re ignoring the brake pedal on your colored pencils.
You’re out of control, going 200 miles an hour through a school zone without even Jesus at the wheel.
Coloring with hard, heavy hand pressure is you letting the pencil make all the decisions.
This is a problem.
Look, I know there’s a lot of free or inexpensive colored pencil information out there.
But you’re getting exactly what you pay for.
How do I say this diplomatically? There are many of hobby colorers making free how-to videos which demonstrate the high-pressure heavy-handed technique as if that’s what every colored pencil artist does.
Nooooooooooooo. Everyone does not press hard!
Colored pencil artists almost never press hard! They also don’t basecoat everything with white or burnish everything by the second layer. Yet I see this this all the time on YouTube.
What looks kind’a-maybe-sort’a okay on a tiny greeting card is not what works for larger scale realistic or artistic coloring. Heck, it doesn’t even look good on 4x6 regular ol’ stamp coloring.
There are also a lot of coloring tutorials from people with five minutes of pencil experience. Learn it today, teach it tomorrow is incredibly common both online and at craft stores!
Colored pencil is one of those things everyone thinks they know how to do. After all, it’s a pencil. We all know how to use a pencil, right?
Nope.
If I’m the first person to mention the fact that you’re pressing the beejeebus out of your pencils, then let’s rethink that free-education plan.
Because you missed something seriously important!
More Colored Pencil Tips:
Don’t miss my previous colored pencil articles about hand grip and pressure. Click the pic to read more


The pressure you use is more important than the colors you pick
Most people start coloring as a hobby or art form because they love color.
So it’s very easy for color lovers to get wrapped up in colormania— as if it’s only about picking the right color. You assume that in order to color well, you need to purchase every color of pencil ever made.
What if I need that color and I don’t have it?
This is a fundamental misunderstanding of how colored pencils work.
Most people look at the paint on the outside of the pencil and assume, “this pencil is that color”.
But that’s not what the paint indicator means at all.
The paint on the outside of the pencil tells you the maximum value of the many shades you can get with the pencil.
Every pencil is actually a range of values, from pale and barely-there to a full strength exact match of the paint color.
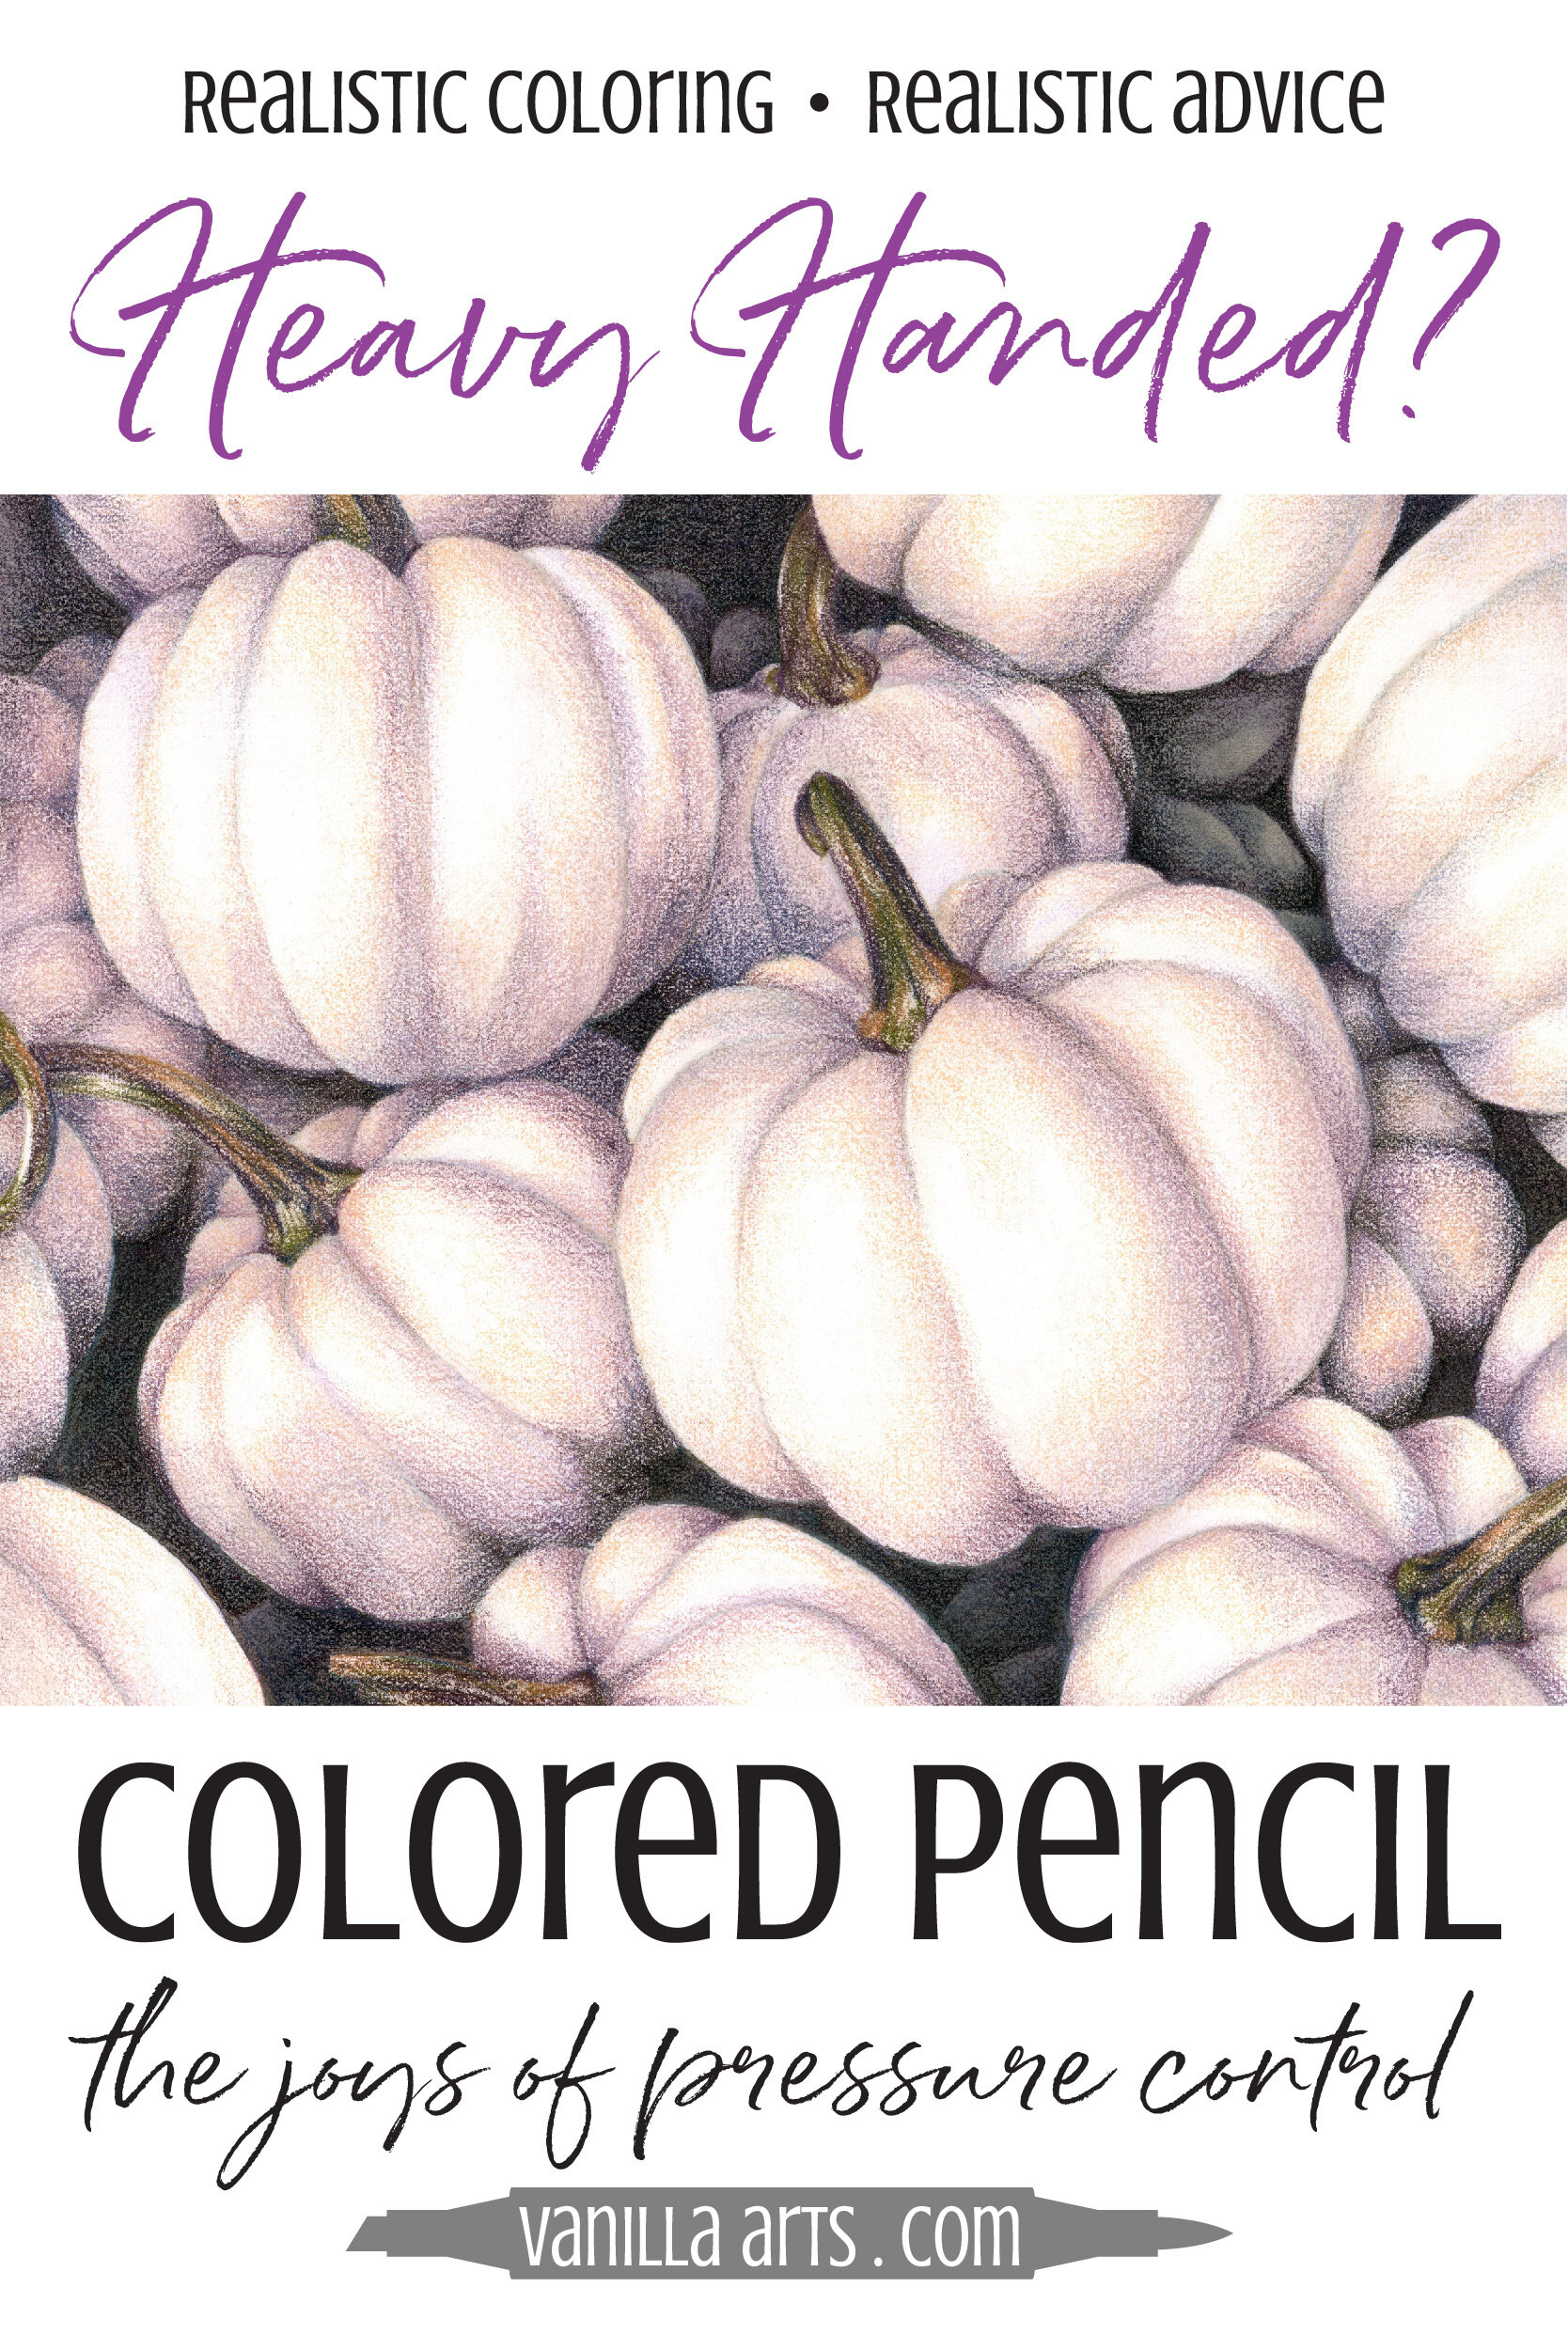
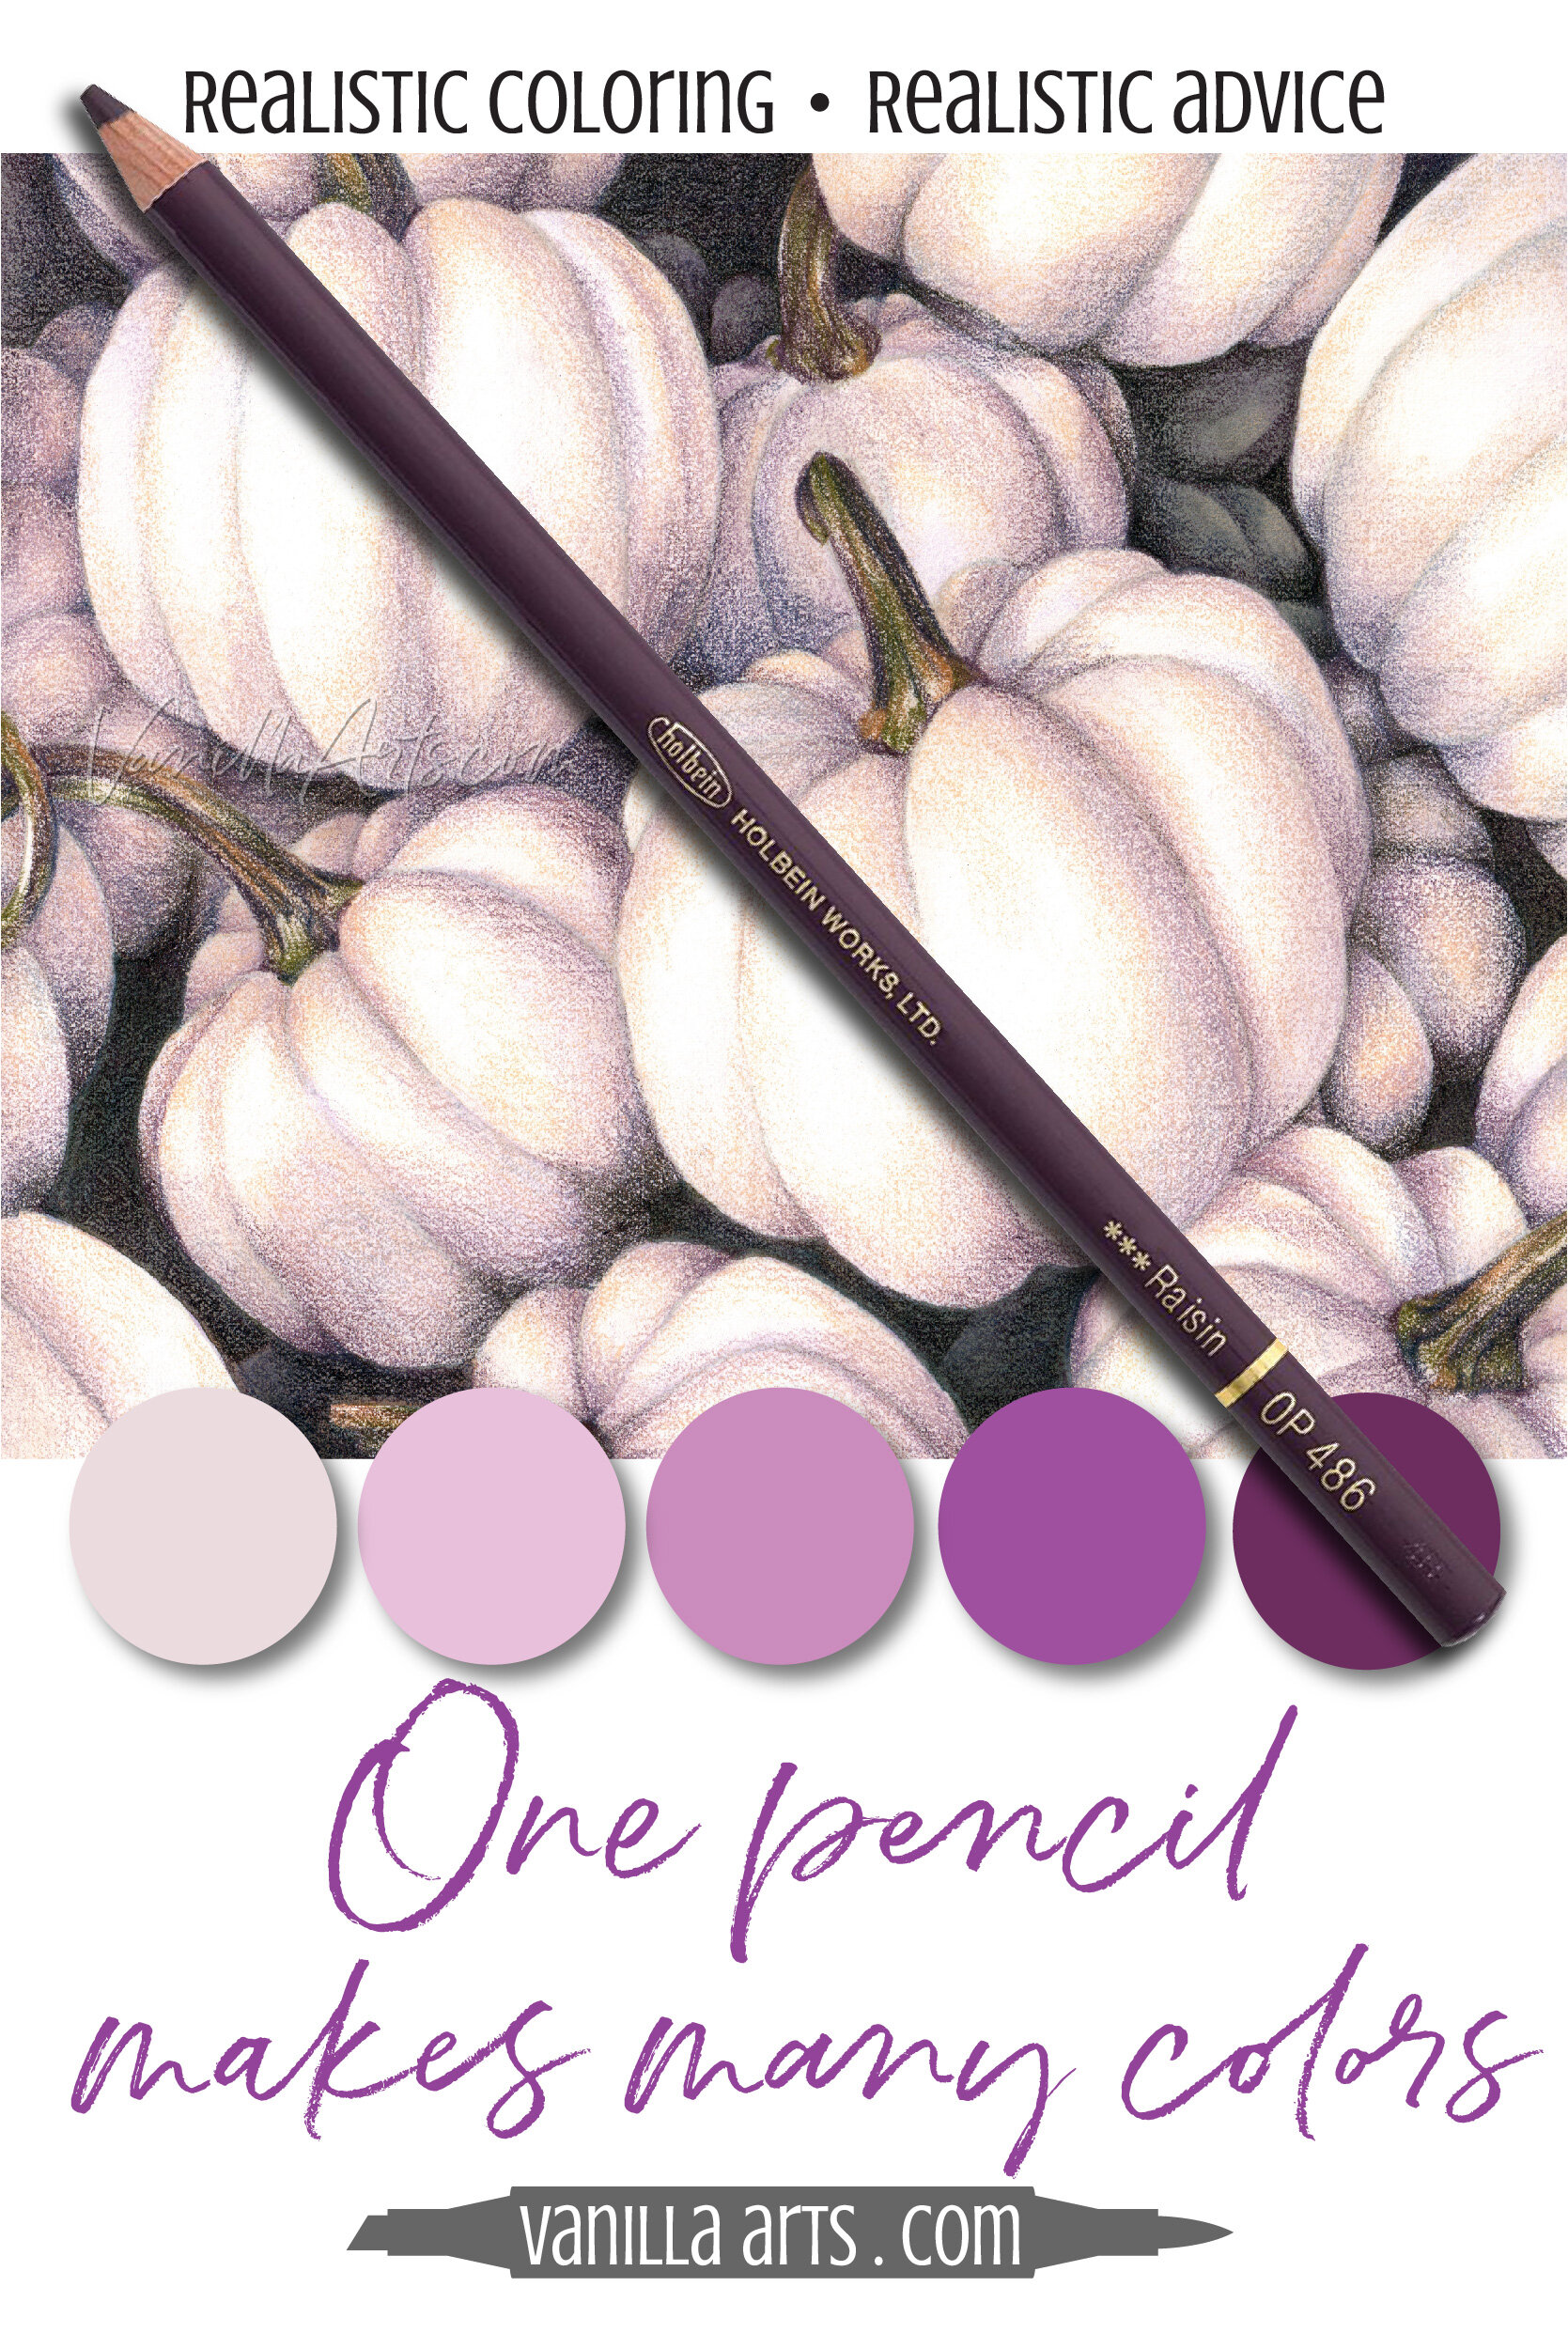
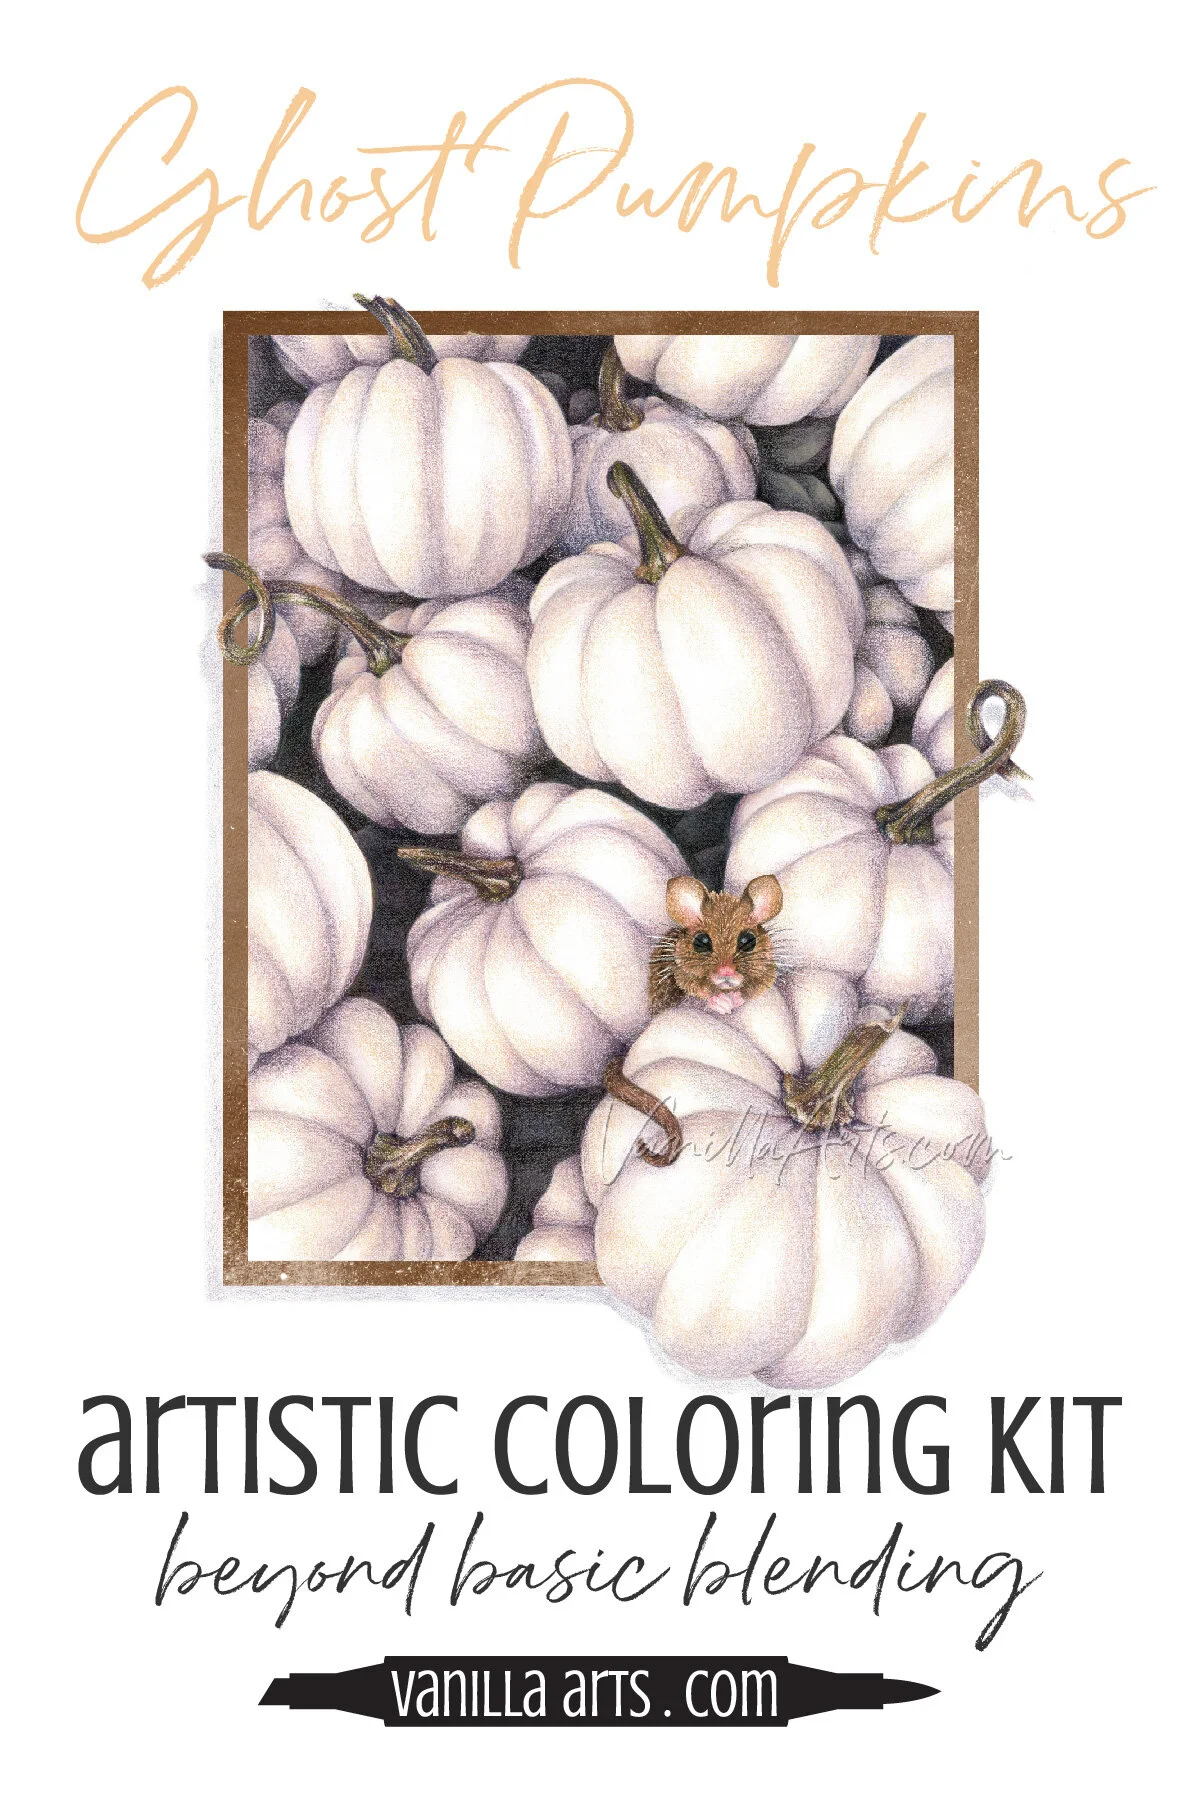
In my Ghost Pumpkin project shown at left, I used the same purple pencil to color the background, the stems, and the pumpkin skin.
Everything you see here uses Holbein’s Raisin OP486.
To color the background, I used moderate pressure.
To color the stems, I lightened up a bit more.
To color the skin, I colored very softly
To create a complete range of purple values from a single dark pencil, you must have full control of your hand and your pencil pressure.
So if you’re someone who spends 20 minutes debating whether to color with a dark or medium purple… or if you’re using four pencils, all the same hue… you’re not taking advantage of colored pencil’s most fundamental quality:
When you control the pressure, you control the color.
Bad paper encourages pressing hard
This is going to rub a lot of people the wrong way—
You’ve spent more money than you wanted to on the set of pencils, now I’m telling you to splurge again on expensive paper. But paper is incredibly important for good pencil technique.
Many people deny the role that high quality paper plays in how hard or soft you color.
Not all paper types are good for colored pencil.
But Amy, this isn’t cheap paper! I made sure the label on the pad said “Ideal for dry media like pencil…”
I’m sorry but when it comes to colored pencils, most paper labels lie.

To make matters worse, when a label says “for pencil” (without the word “colored”) it usually means graphite which is totally different than colored pencils.
It doesn’t matter what the label says, it’s how the paper feels.
We’re looking for ideal tooth.
Tooth is what we call the paper fibers.
A hot-press, smooth, or “plate” paper has been hot-ironed flat during the manufacturing process. This presses all the paper fibers down flat. Smooth paper is toothless.
For cold press paper, they leave more paper fibers standing upright. We want this kind of tooth for colored pencil art because it grabs hold of the pigment as we color.
Too much tooth is also bad. With “rough” paper, it can be hard to fill in all the valleys between the teeth. Your coloring looks like sidewalk chalk art.
Colored pencil people are the Goldilocks of the paper world. We don’t like anything too smooth or too rough. We want it just right.
And the label will never tell you that! You have to feel it with you fingers or test it with pencils to know.
Ideal tooth is important because paper communicates with your hand as you color!
As you color with colored pencil, you can feel the toothiness of the paper. It’s a friction thing. Different papers feel physically different.
Even if your brain doesn’t register the friction, your hand does.
Your hand will naturally press harder when the tooth is wrong for pencils.
Cheap paper tends to be on the rougher side. So your hand automatically presses harder to help fill in the giant toothy valleys faster.
Many card makers try to use smooth card stock which is great for stamping but is far too smooth for colored pencil. In this case, your hand presses harder trying to get the pencil to stick.
Coloring books are notoriously bad for pencils. I can’t tell you how many videos I’ve watched where the poor woman praised the “beautiful thick glossy paper” and then had to press with all her might to make a mark.
It’s not totally your fault either. Think about when you first colored with pencils— in elementary school, working on lined notebook paper or copy paper. That’s terrible paper for pencils!
Here’s the danger: The longer you work on inappropriate paper, the more your hand gets used to using more pressure than necessary.
So even when I switch my colored pencil students to great paper, they’re stuck in the habit of coloring hard enough to cause numbness.
Bad paper teaches you to press too hard.
This article contains affiliate links to trusted retailers like Blick.com and Amazon.com.
Vanilla Arts Co. is a participant in the Amazon Services LLC Associates Program, an affiliate advertising program designed to provide a means for use to earn fees by linking to Amazon.com.
This is not a sponsored post.
Burnishing is not a requirement!
Most of the students in my beginner colored pencil classes are complete newbies. They claim not to know any colored pencil techniques and yet somehow they all know about burnishing.
Which is sad because everyone thinks burnishing very important when I know a ton of amazing pencil artists who rarely do it. Heck, I’m one of them.
What is burnishing?
Burnishing is when you’ve filled in the tooth of the paper so completely that the pencil layers start to take on a smooth and shiny appearance.
New colorers think everything should be burnished, so they’ll color all the dark spots hard, then scrub all the light spots with a white pencil until the entire image is burnished.
Hang on.
This is not necessary.

Burnishing is one pencil technique.
But it’s not the only technique.
And it’s definitely not the most important technique.
Here’s what most people misunderstand about burnishing:
You can burnish with hard pressure but it looks terrible when you do it this way.
The best burnishing effects happen when you use very little pressure at all.
Which sounds contradictory. How do you fill in the tooth without coloring hard?
Simple. Color softly.
But do it with more layers.
Burnishing will naturally happen as you build up many layers at a soft pressure.
When you use a soft circular stroke, you’ll gradually hit the tooth from every angle with your colored pencil. As you add more layers and more colors, the pencil builds to a complex and organic looking burnish.
In my Ghost Pumpkins project, if you look between the pumpkins to the dark pumpkin shapes in the background, they were created using the natural soft burnishing technique. I darkened the background, then slowly worked more layers of pencil over it to create the deeply shadowed pumpkins.
And that’s the only burnishing I did.
The pale pumpkin skin isn’t burnished. The stems are not burnished. Even the almost-black background parts are not burnished.
And nothing is obnoxiously shiny or plastic looking, which happens with pressure burnishing.
It’s a myth that you must burnish when using colored pencils.
Be smart.
Only burnish when smoothness will contribute to the texture or depth of your subject.
Correct your grip and posture for better pressure control
Your pencil grip controls the pressure you apply to the paper.
And it’s not all about your hand and wrist, your posture plays an important role too.
I have several articles here at Vanilla Arts to help you improve how you hold the pencil. I make these same corrections with students in my local classes but since I can’t be there to help you in person, let’s walk through the basics about grip and position.
And here’s one more issue I haven’t written about yet, but it’d certainly make a good article:
You can’t color well from a slouchy couch or lounge chair.
There’s a reason artists work at slanted desks in specialized rolling chairs with tilt control: POSTURE MATTERS


Save money by coloring softly
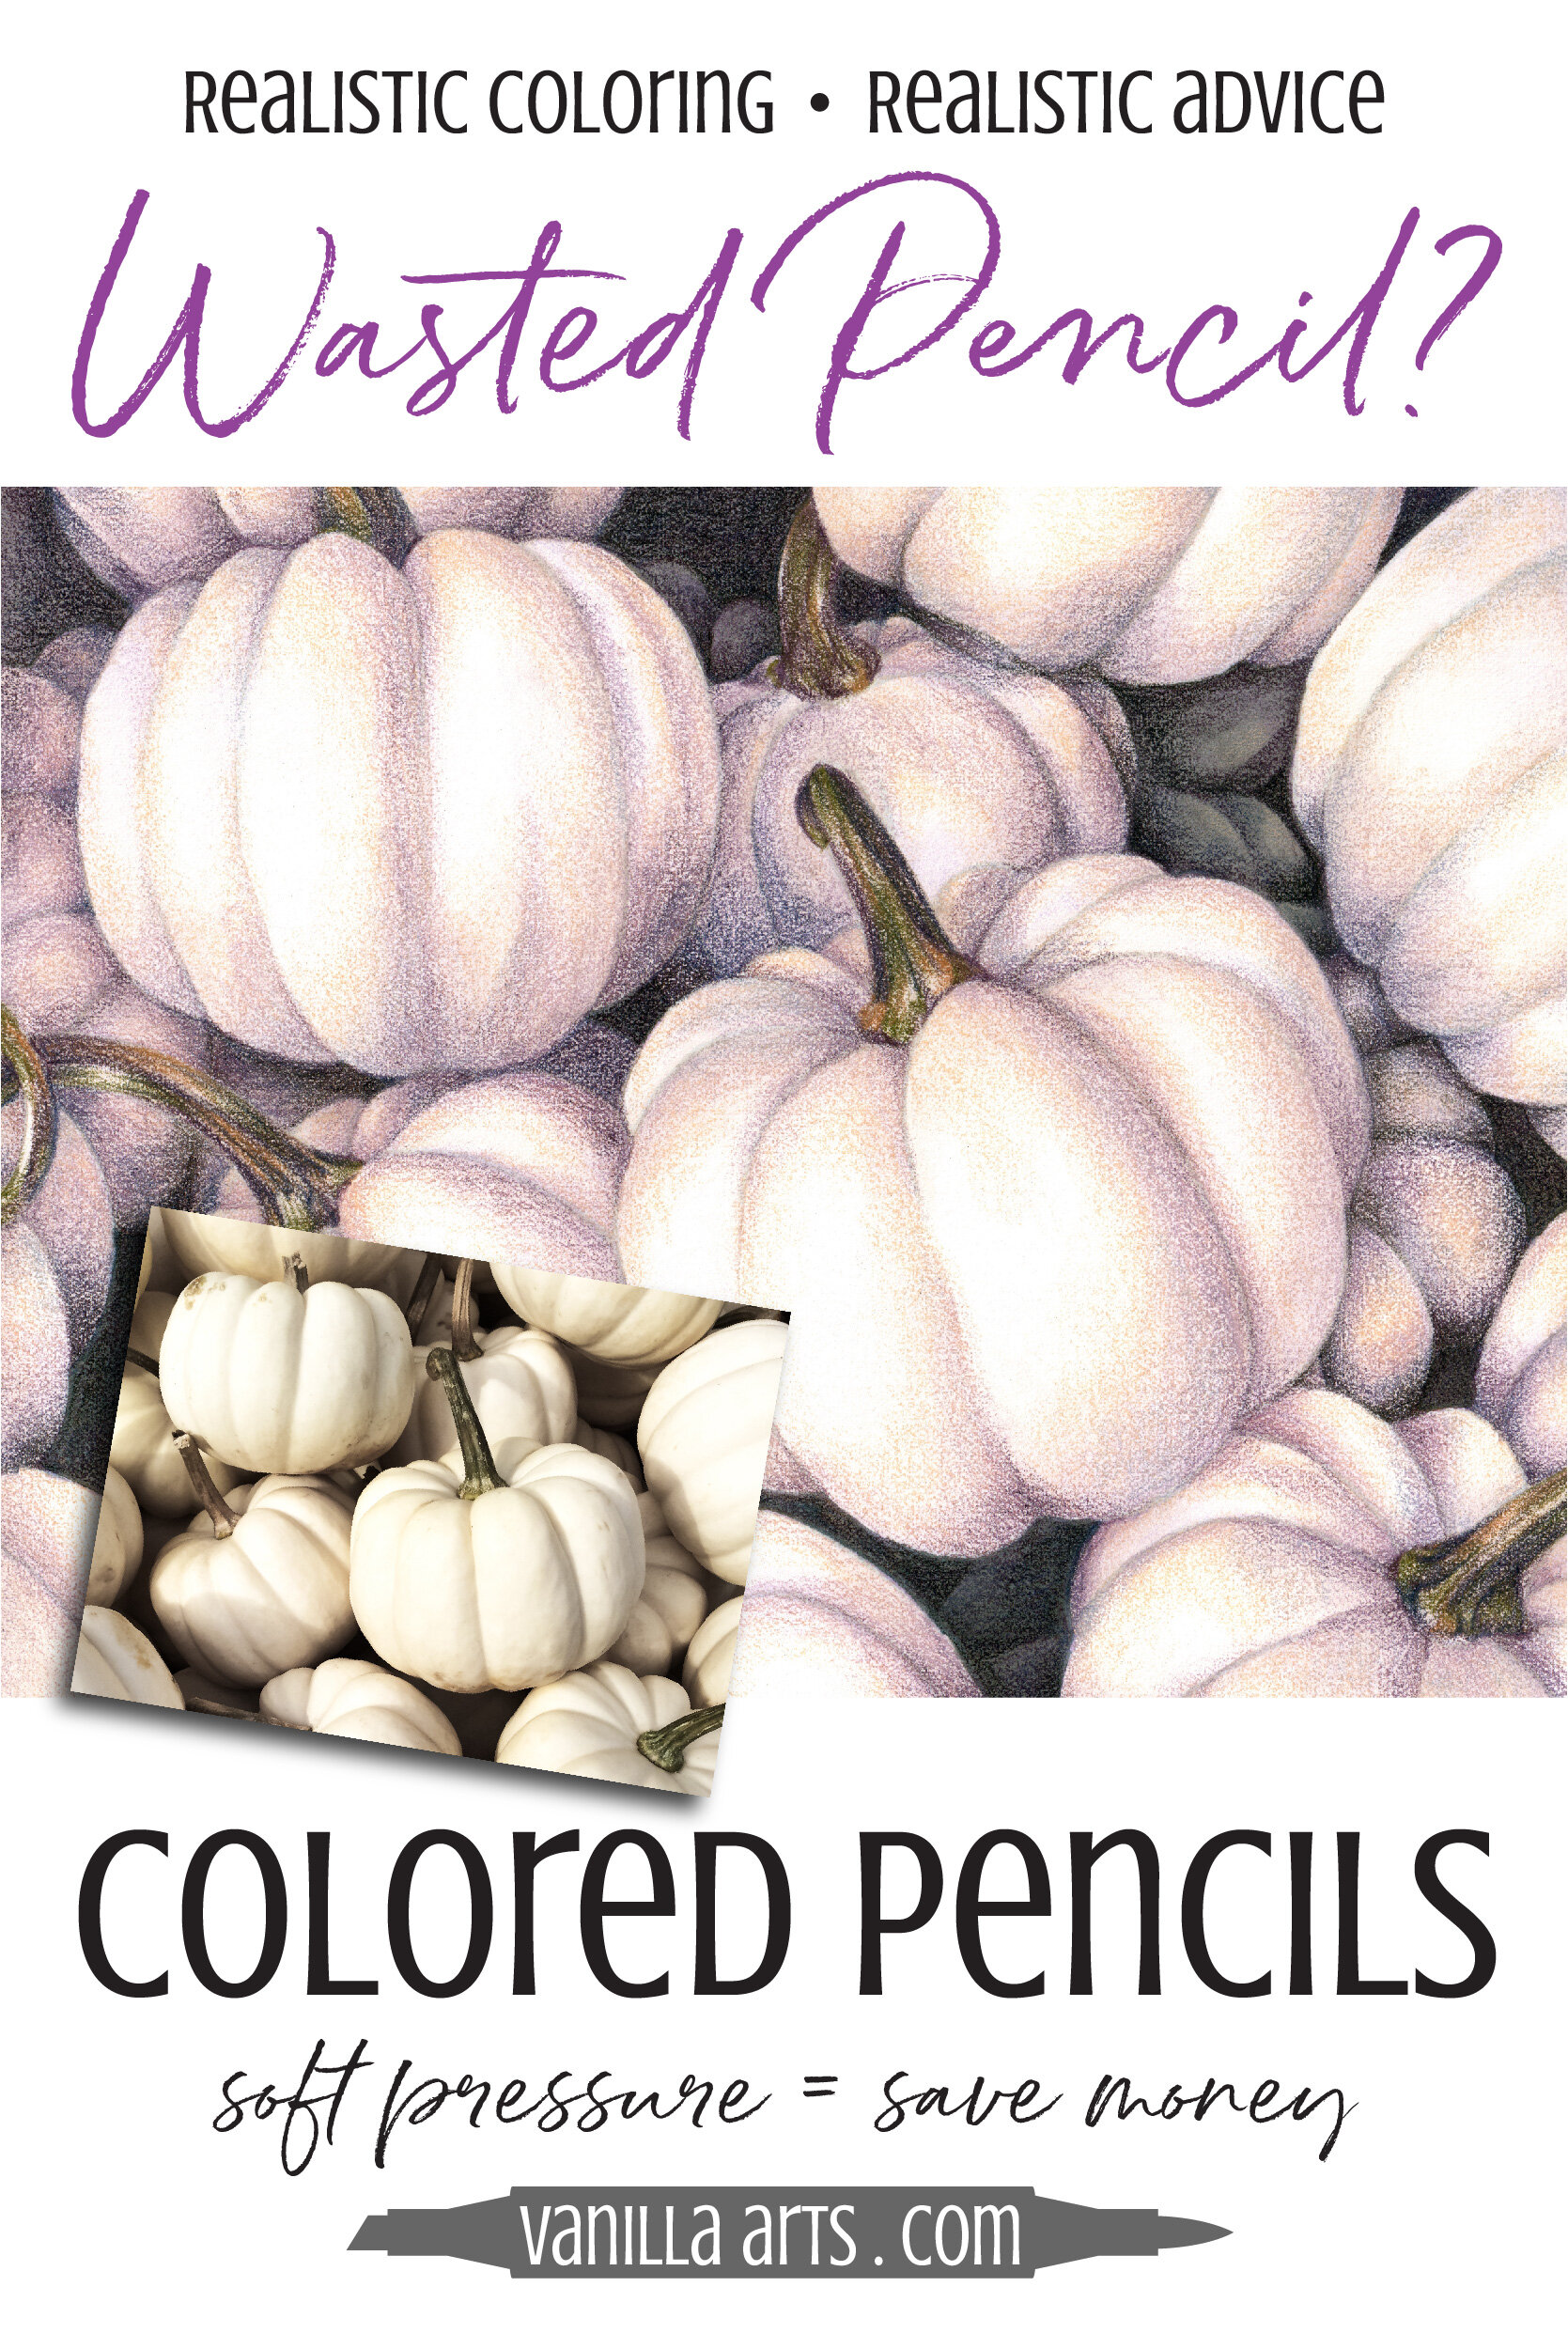
As I said at the earlier, if you can make several values out of the same pencil by simply altering your pressure, this allows you to work with a smaller number of pencils.
With pressure control, I spend less on pencils because I use fewer colors.
Here’s an article I wrote on the same subject:
But that’s the not the only savings a light touch will give you.
I’m always amazed at the lengths pencil people will go to avoid sharpening their pencils. I see lots of videos and article pics featuring very dull pencils.
I guess pencil shavings might as well be shredded dollar bills?
Yet many of the same people use super-firm pressure, applying far more pencil pigment to the paper than needed.
Burnishing wastes a ton of pencil lead!
To me, that’s dollar bills of wasted wax.
Guess what else happens when you press too hard?
<snap>
Who sharpens more? Heavy handers.
Color for a lifetime without fatigue or pain
I had a great high school art teacher. He introduced me to colored pencils back in the 1980s, long before pencils were taken seriously. He taught me a lot of great techniques which I still use today.
What I didn’t realize is that he also set me up for a lifetime of art.

He taught me how to control my pencil pressure, both for sketching and for colored pencil rendering.
I didn’t know what a tremendous gift he’d given me until I walked into my first Colored Pencil Society of America meeting.
The room was full of people in wrist braces.
Carpal Tunnel Syndrome is caused by repetitive motions and excessive pressure which pinch the median nerve running through your wrist into your palm, thumb, and first two fingers.
First you feel a tingling but with time, the tingles turn to numbness or even pain.
Colored pencil artists are very prone to Carpal Tunnel Syndrome
If scientists wanted to spread Carpal Tunnel Syndrome far and wide, they couldn’t design a more efficient way of inducing it than to have people color long hours with thin pencils using firm pressure.
Remember, thanks to my high school art teacher, I rarely burnish or use firm pressure.
I’m 50 years old and I’ve been working with colored pencils since 1985. I’ve been a full time artist for almost 30 years.
With no sign of Carpal Tunnel Syndrome.
Sure, I’ve got other aging issues but my wrists are great. Thank you, Mr. Hubbard!
A light touch does not mean “unfinished”
I know, there are some people who think colored pencil art just doesn’t isn’t done without the final heavy pressure burnishing layer.
I strongly disagree.

There are many elements which go into a piece feeling finished or unfinished.
Burnishing isn’t one of them.
I take great care to develop pleasing composition with balance and no hanging or weightless elements.
I create cohesive color palettes and balance the spread of color evenly.
I use a full range of values and I take care not to over or under value the color of anything in the image.
I develop every object within the image to the appropriate level of finish.
I use white and soft colors with deliberate care, insuring that these areas stay clean and intentional looking.
It’s pure myth that high pressure coloring makes colored pencil art look better.
It’s you and your artistic skill which makes colored pencil art look professional and complete.
Burnishing doesn’t provide artistic balance. It doesn’t enhance the composition, color, values, or level of professional finish.
It’s just rubbing your project hard with a pencil.
Sealing everything under a heavy-handed layer of pencil wax makes you feel falsely accomplished.
Rethink the necessity of pressing so darned hard with colored pencils.
You’ll find greater artistic potential on the light side.
“Ghost Pumpkins” and the little stowaway critter were colored with watercolor and Holbein Colored Pencils
Where can you find Holbein Colored Pencils?
Dick Blick or Blick.com
Please exercise caution when buying from unathorized retailers or resellers. You may not be getting authentic merchandise, guaranteed quality, or pristine pencils in new condition.
We will update this area as more retailers are authorized.

Not just falling leaves
Someone knocked over the pumpkin crate…
Ghost Pumpkins
Artistic Coloring Kits are everything you need to challenge yourself with intermediate to advanced level images.
Color warm white pumpkins with anything but white
Let your skill & creativity be the star of the image, not the stamp art. Ideal for large-scale projects in Copic Marker, colored pencil, or watercolor
Kit includes: digital stamp, suggested supply list, photo references, guide to shade and shadow & underpainting advice, color map & coloring process tips & photo collage
Select Products used in Ghost Pumpkins:
Vanilla Arts Company is a participant in the Amazon Services LLC Associates Program, an affiliate advertising program designed to provide a means for use to earn fees by linking to Amazon.com.
