Celebration Cupcake, a Copic and Colored Pencil Marker Painting Workshop

 
Celebration Cupcake - a Copic and Colored Pencil Marker Painting Workshop.  Learn the universally adaptable technique for coloring folds and waves.  | VanillaArts.com | #copic #coloredpencil #realisticcoloring


Make a wish!

People frequently ask for a class on clothing. Here you go!

Celebration Cupcake

Learn the universally adaptable technique for coloring folds and waves.

Soft fluffy frosting and tasty cake, perfect for any birthday celebration. We’re coloring gentle waves of frosting and crisply folded pleats but you can use it on skirts, shirts, curtains, or anything else with folds.

Real time coloring, recorded live

Live Workshops are unscripted demonstrations which provide students with a real look into the authentic coloring process. You’ll see mistakes being made and corrected. It’s just like visiting Amy in her home studio.

Log in and color with Amy at your convenience. Anytime access, no expiration dates. Class was recorded in March 2021 and featured a live student audience. Amy answers questions from the students and offers many tips for better colored pencil art.

Class Kit includes: digital stamp, photo references, supply list, value reference, color map, plus helpful tips and work-in-progress photos

VanillaArts.com


How Important is a Pencil Sharpener?

 
Pencil sharpeners are important when working with colored pencils. Amy shares why a sharp pencil is one of the keys to making your coloring easier, and more enjoyable. | VanillaArts.com | #coloredpencil #realisticcoloring #howtocolor


Let’s talk about Pencil Sharpeners!

Oh, no… that might be a sticky conversation. The three topics of conversation to avoid at your next dinner party are: religion, politics, and the best way to sharpen a pencil

At least when dining with artists.

You think I'm joking, but I've seen a woman brought to tears over the subject. Not kidding. People have some seriously strong feelings about this.

And the rest of you are sitting there wondering what the heck I'm talking about...

Pencils are an important tool of the trade. Actually, "important" doesn't begin to cover it. Pencils are absolutely vital to art.

And behind every good pencil, there's a good pencil sharpener.

(Yes, even mechanical or wood-less pencil mavens shape their leads to a preferred point.)


There are three major schools of pencil sharpener philosophy:

Best pencil sharpening methods | VanillaArts.com

Top to bottom:

  1. Prismacolor sharpened with the Prismacolor brand HAND-HELD PRISM STYLE SHARPENER

  2. Prismacolor sharpened with an ELECTRIC, ROTATING SPIRAL BLADE SHARPENER

  3. Charcoal pencil HAND SHARPENED WITH A BLADE OR KNIFE

Where an artist comes down in the Great Sharpener Debate usually has a lot to do with their training. That drags emotional baggage into the discussion because we all secretly think we're the only ones to receive a proper education. After all, the rest of the field is filled with dithering idiots, right?

But this debate leaves the crafters of the world completely befuddled because they're surrounded by teachers, magazine tutorials, and craft show experts who are all dispensing completely contradictory information.

Use electrical! NO! Use a hand held! NO, THAT'S NOT RIGHT! You'll only get good results from a razor blade!

Because I work with beginners (and also a lot of derailed artists looking to get back into the groove), I get asked the pencil sharpener question. A lot.

And I always answer the question with a very firm...

Well, it kinda depends.

Flag FC.jpg

 I know. My answer is complete mush. But hear me out, the correct answer depends entirely upon what you are trying to accomplish and what materials you are using.

I use the sharpener that works best for me. I've tried several methods and a ton of tools, and after 25 years, I know what works for the work I do.

There's really no point in jello wrestling over this. What sings for me on small scale items will not work for let's say, a muralist. And neither of our methods may be right for you.

So for you, it does no good to ask just any random artist "what's the best pencil sharpener?" You need to narrow your inquiries to only those artists working in your same medium and who are producing the same stroke quality you desire to imitate.

How did you sharpen your pencil to make this mark? And then point to the area you're interested in. That's the correct question


There is not one correct answer- Be willing to test new methods

My primary mentor hand-sharpened all his pencils with a box cutter blade and made us do the same. Hand sharpening has its place- the charcoal pencil shown above is the pencil I use every Wednesday for life drawing class and I always use a blade on it.

But that same blade method produces a completely awful point on Prismacolor pencils.. Why spend 3-5 minutes doing it old school if the tip is inferior to 20 seconds in an electric or hand sharpener? It is an improper use of my time to whittle colored pencil leads for my high detail projects


As a teacher, the best thing I can do is present the various methods which may work for your situation.

What kills me is when a student is clearly having problems and yet ignores my solution because a mentor sold them on a different pencil sharpener.

And I've had more than one student prance into class with their Michael's recommended, Prismacolor certified pencil sharpener- a sharpener that yields a blunt and soft tip that is completely inappropriate to the method I teach.

Yes, I understand that the word on the street is that the Prismacolor sharpener is the only one suitable for sharpening PC pencils- that it saves lead, money, and frustration. Everyone should own two and use them every darned day.

To which I say "pfffttt, maybe"

But if a student is looking to duplicate my stroke quality, they're never gonna get it with that sharpener. Never. Never, never, never. You'd have a better chance at mimicking me with a hand bladed pencil lead than using the Prismacolor sharpener.


Why I use what I use

Four Girls FC 2 h2o.jpg

Let's stipulate my parameters first: I do large areas and backgrounds with Copic marker and I do the super-fine detail work with colored pencil. I use cross hatching to build up layers of visible strokes rather than soft-blending. I never use solvents.

Because of this, I require a super fine tip that retains a point for as long as possible. Blunt tips are pretty useless to me and my stroke quality noticeably degrades as the point disappears.

To get a fine point that lasts as long as possible, I use an electric sharpener that gives me a long narrow taper. I had a plug-in heavy duty Boston Electric desk model which my cat killed in April. Apparently, it was in the way during a nap emergency. I'm now researching a replacement plug-in model and it looks like Boston Electric was bought-out by X-acto which has poorer quality ratings.

Until I replace the desk version, I'm using the cheapo yet portable battery sharpener which I take to classes, an Omnitech model made for Staples Office Supply stores. I've had it about 6 years and it still sharpens just fine. It's loud and cheap and at a $7 price point, I'll be the quality control isn't great. But my little guy doesn't eat batteries too fast, and if I ignore the obnoxious color, it's really not too bad. 

Plus, the darned thing won't die. Best $7 investment, ever!

As you can see, the brand, price, and color are not my main focus when selecting a sharpener. I look for two features:

  • Long narrow taper on the point

  • Point-trigger feature that prevents oversharpening

The objection to electrical sharpeners is that you waste pencil lead. And while that may have once been true back in maybe 1962, it's not really a problem today. Even my cheapie has a trigger button inside that stops the blade from rotating after the pencil has been fully sharpened. You simply can't sharpen a pencil for 2 hours straight if it has that stop-button safety feature.

In fact, I had one student vehemently object to my not using a prism sharpener due to lead wastage. So I showed her my Omnitech which had about a weeks worth of shavings in it and we compared that to the pile of woodchips that she'd generated in 1 hour of class time... there was no comparison. I was clearly wasting less wood because my sharpener knew exactly when to quit.


My Goal: A long, narrow point

I'll use any sharpener that gives me that long length of pencil lead.

One, because I want to leave a fine line but two, I don't want to sharpen as often.

Here's an enlargement of my sharpened pencils. The left is my Omnitech cheapo and the right is the premium Prismacolor hand held.

Assume that we both take 10 strokes to wear down our leads to the orange line. Look at the difference in diameter! One can go longer between sharpenings with a long taper tip because it stays thinner longer.

Yes, I know. Prismacolor does tend to break more often with a long taper but here's the thing I've noticed: when it does break, there tends to be a sharp edge left that I can use for about a dozen strokes before I have to sharpen.

In my classes, most of the time when a student is having difficulty, it's in large part due to a dull lead. I've noticed that they make a stroke, it doesn't look quite right so they put a new stroke on top of it, and then another and another and another. If they'd just sharpen, they'd get the stroke right the first time instead of overworking the area.

Ultimately, what good is all that saved pencil lead if you never learn to do a technique properly? Even worse, you pay for it emotionally when your results don't match up with the teacher or your neighbor's. The cost of a colored pencil is minimal compared to the price you pay in confidence and self esteem.


I also use blunt tipped pencils

Sometimes the situation does call for a smoother blend with no visible strokes. Like backgrounds or on faces- places were I want to hide my lines.

Remember, different situations call for different techniques. Good artists are chameleons and will adjust their technique to get the best results.

What do I do when I need a soft blunt tip?

Peach is a color that I use for both soft and hard strokes. So I have two peach pencils, one usually has a fresh point on it and the other is dull. I have about 6 colors that I keep two versions of

  • peach

  • light peach

  • white

  • indigo

  • dark green

  • tuscan red

I'm not suggesting that you do a Noah and keep two of everything in the ark, but if you find yourself constantly scribbling on scrap paper to wear down a point, you might want to keep a second of that color handy and dull.


Worried about wasting lead?

Want to know what really, really, really extends the life of your pencils, no matter what sharpener you own?

Pencil extenders. They come in all sorts of varieties (some are far more comfortable than others) but they all add about 4-5 inches of handle to short pencils.

I own fourteen.

They work best when the pencils are 2-3 inches long, longer than that and they try to bend under firm pressure.

I regularly use my pencils down to nubby stubs. My record is just under 1 inch long and I had to quit because there wasn't enough pencil to grip while sharpening.

That same student who chided me for wasting lead in an electric sharpener was throwing away all pencils shorter than 4 inches long.

Hmmm... who wastes lead???


It's never a cut & dried answer

You need to evaluate the way you use your pencil and choose the sharpener that gives you the desired point.

If you do soft circular strokes with your colored pencil, my long narrow point is not going to work. You're much better off with a sharp knife and an altoid tin to catch the shavings.

If you're afraid of blades, then try the shallow prism sharpeners.

The point is that anyone who emphatically insists that Brand X sharpener is the only sharpener for all of mankind is wrong.

And frankly, I'd question their judgement on more than just sharpeners.


Find recommendations from artists that you admire

What's the best sharpener for art pencils?

The winner of your tests. The best sharpener is the one that works for you.


VanillaArts.com
 

For specific information on long-point sharpeners, you can check out this article:


Imikas Sharpener.jpg

December 2017: I never did purchase a big electric plug-in sharpener.

That ugly Ominitech battery powered sharpener is still going strong. I'll use it until it dies.

I've also found the same sharpener in a tasteful black! 

Everything about the Imikas sharpener is the same as my trusty old ugly Omintech. EVERYTHING, right down to the lettering imprinted on the battery closure and the waffle grooves on the rubber feet.

41InQleibJL._AC_US436_QL65_.jpg

Now I have an ugly sharpener for home use and the sedate black one travels to classes with me.

February 2019: The Imikas sharpener from 2017 pictured at left is no longer reliably available on Amazon.

There is a newer version (see link below) that still gives great results. Use the sharpest setting to get the kind of point I recommend in this article.

Note: Neither of the Imikas versions nor the original Omnitech can be considered “luxury” sharpeners. They’re inexpensive BUT they still should work smoothly. I have one student who purchased the 2017 version which worked really slowly, despite fresh batteries. That is NOT normal! She returned the sharpener and the replacement is still working fine.


I also have a favorite hand-held sharpener-

Kum sharpener.jpg

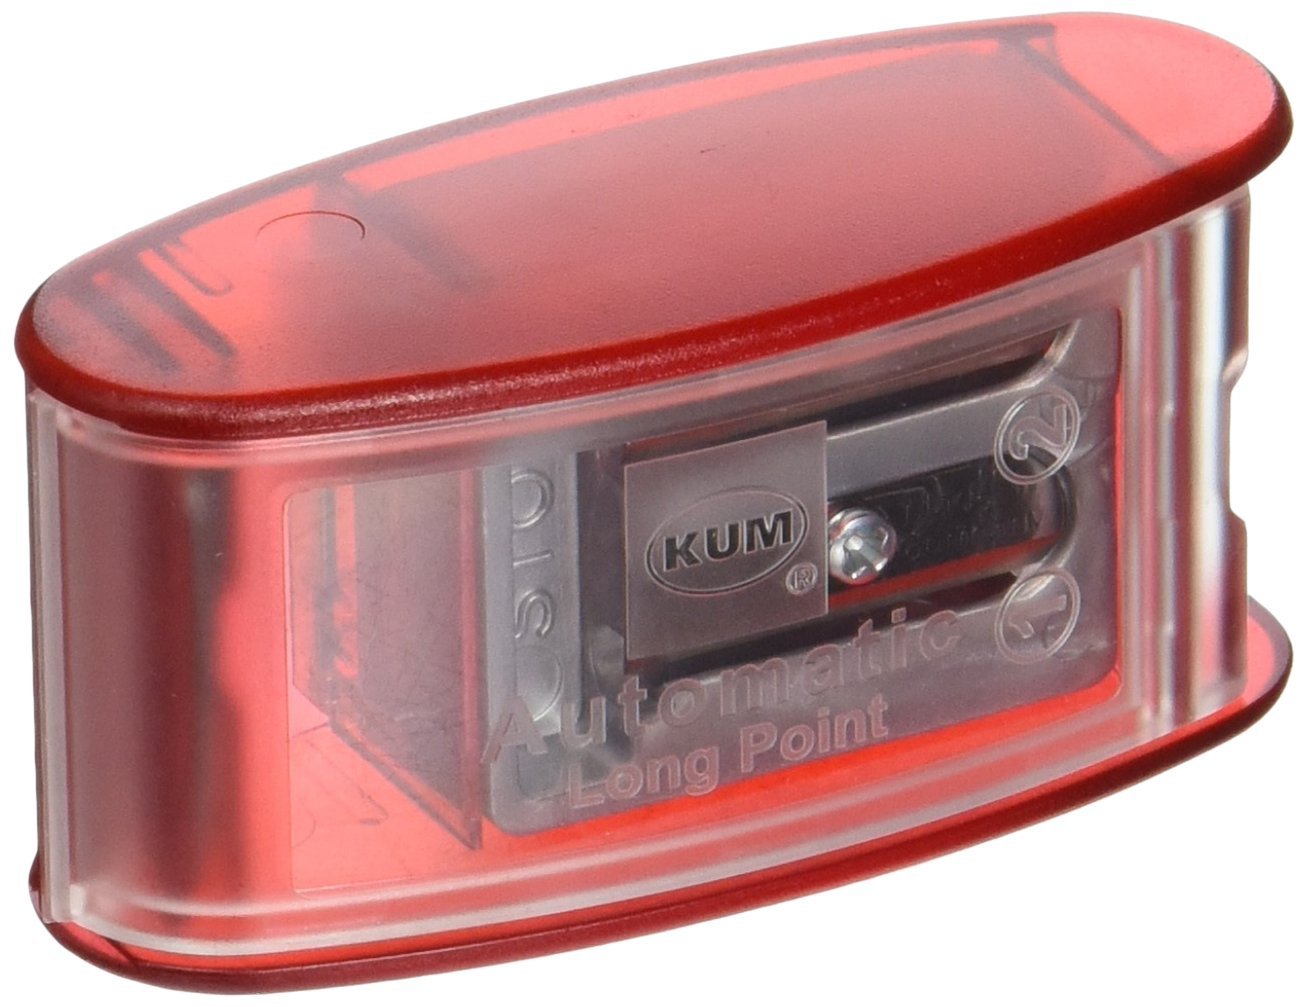
The KUM AS2 Long Point sharpener goes with me everywhere. Like the Imikas, it's very reasonably priced (under $10 USD) which is cheap enough to own several.

I have one in my class supply bag. I have one in my watercolor travel kit. I have on in my colored pencil kit. I have two more in my desk drawer just waiting to go on an adventure. 

By the way, there are two similar sharpeners by KUM. The AS2M is blue instead of red and has a lead pointer on the side. I never use the pointer. It's the same exact sharpener otherwise. I would not pay more for the blue AS2M version.

The Palomino Blackwing edition of the KUM is an AS2 (red), this time you're paying more for black plastic to match your Blackwing pencils. Here's a crazy thought- buy the red sharpener and use the savings to purchase two Blackwing pencils!

Here's a link to the KUM at Amazon (affiliate link):

I will admit, I like the Imikas/Omnitech sharpener better than the KUM but the KUM is still spectacular and gets an A+ from me.

Why do I favor the Imikas? It's a minor thing. The KUM gives you a slightly longer point than the Imikas which might be too much of a good thing. The KUM point is just a smidgen too long for Prismacolor Premier pencils to handle. If I sharpen in the KUM, I inevitably break off a teeny-tiny bit of the point on the first stroke... but it's less than 1mm loss, nothing to cry over.

It's easy to solve the KUM problem by not sharpening to the extreme limit. But with the Imikas, I don't have to think and plan to pull out early. So a slight edge goes to the Imikas but not by much.

Sticky Tack: The Gentle Eraser for Colored Pencil

 
Use sticky tack to correct colored pencil | VanillaArts.com


“Primum non nocere”: First, do no harm

Abrasive Detail Erasers- Total Overkill | VanillaArts.com

This is something that runs through my head when a student pulls out one of these to correct a colored pencil mistake.

This is a detail eraser. It is designed to scrub away ink or grease mistakes from office grade, smooth paper. It is a very firm eraser which allows it to be sharpened to a fine point for small areas. It's also highly abrasive which means it rubs away more than just the mistake, it takes off the top layer of stained paper fibers with it.

But for soft, waxy colored pencil on delicately toothy paper?

You might as well use a hand grenade.

If you've got one of these weapons of mass destruction in your art kit, go put it back in the office drawer, where it belongs.

Right now.

I'll wait here.

I've been using colored pencils on an almost daily basis for over 25 years. I can honestly say that I've never encountered a situation where a mistake was so bad that it required stripping off the entire top surface of my paper.

Yes, I've made serious mistakes, but nothing that ever required the use of a hand grenade.


Colored pencils work best on toothy paper

Toothy paper for colored pencil | VanillaArts.com

Tooth is texture; tiny little micro mountains that grab and hold colored pencil pigment.

If you've tried using colored pencil on slick paper, you know how hard it is to get it to lay down smooth and not rub off. It's like trying to spread peanut butter on freshly Zambonied ice. You can try but hey, good luck with that.

Paper quality is a big deal; toothy paper is something colored pencil artists pay extra for.And that hand grenade eraser up there? It'll kill your paper.


Respect the tooth

Now I'm going to assume that most stamp colorers are using some form of office grade cardstock for colored pencil. There's nothing wrong with that, not all projects deserve special paper.

But that doesn't mean that you can ignore the tooth. In fact, because you're using only moderately textured paper, you need to protect the limited tooth EVEN MORE than someone working on generously toothed, premium cold press paper.

Abrasive erasers wear the paper smooth. The more you rub, the less tooth survives. So yes, you may have removed the offending mistake but when you reapply color, that smoothed area will not grab the colored pencil the way it did before. If you really damage the paper, you'll have a shiny zone that stands out to viewers.

So when you make the inevitable mistake and you reach for an eraser, remember Primum non nocere- first do no harm.

Start with the most gentle eraser you can find. If that doesn't lift the error, then bring out a slightly bigger gun. Do not start with a Tyrannosaurus Rex eraser; start with a soft, fluffy, white bunny rabbit.


Sticky Tack is the fluffy bunny of the eraser world

Lift mistakes with sticky tack | VanillaArts.com

Sticky tack?

Yep. Poster putty. The stuff that your fourth grade teacher used to put "Hang in There" and "Give a Hoot, Don't Polute" up on the class room walls.

This stuff.

Duck is a good brand, so is Scotch Brand. You want the white kind, not the softer blue or green versions.

Pull off one  strip (there's usually 8-12 strips per package). A single strip is enough to last for at least 6 months. You'll need a small airtight container (film canister sized) to hold your working piece. Pop the rest of the package into a zip lock bag for longer term storage.


Sticky Tack is Not a Kneaded Eraser Substitute

Gently lift errors with sticky tack | VanillaArts.com

Gray kneaded erasers are for working with charcoal, graphite, and chalky dry pastels. You drag gray erasers across the paper to gently lift powdery marks. Gray erasers are lightly abrasive and they are not sticky enough to lift stubborn and waxy pigments like colored pencil.

Sticky tack is lightly sticky. That's why it works. Use it the same way you used Silly Putty to lift up your favorite Sunday Comics.

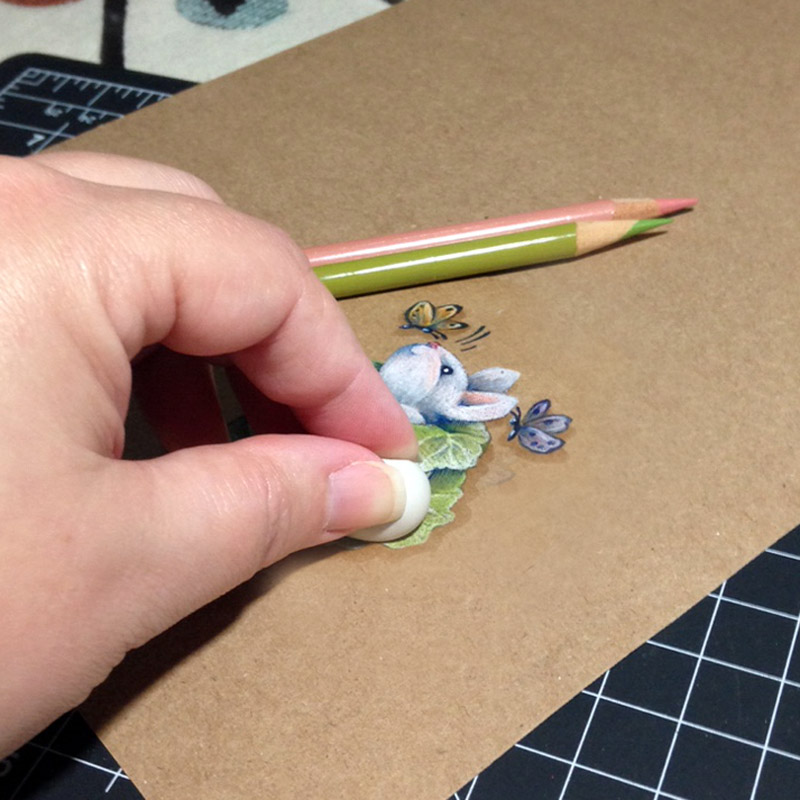
  1. Soften and knead the sticky tack into a smooth, warm ball.

  2. Gently press into the surface of the mistake.

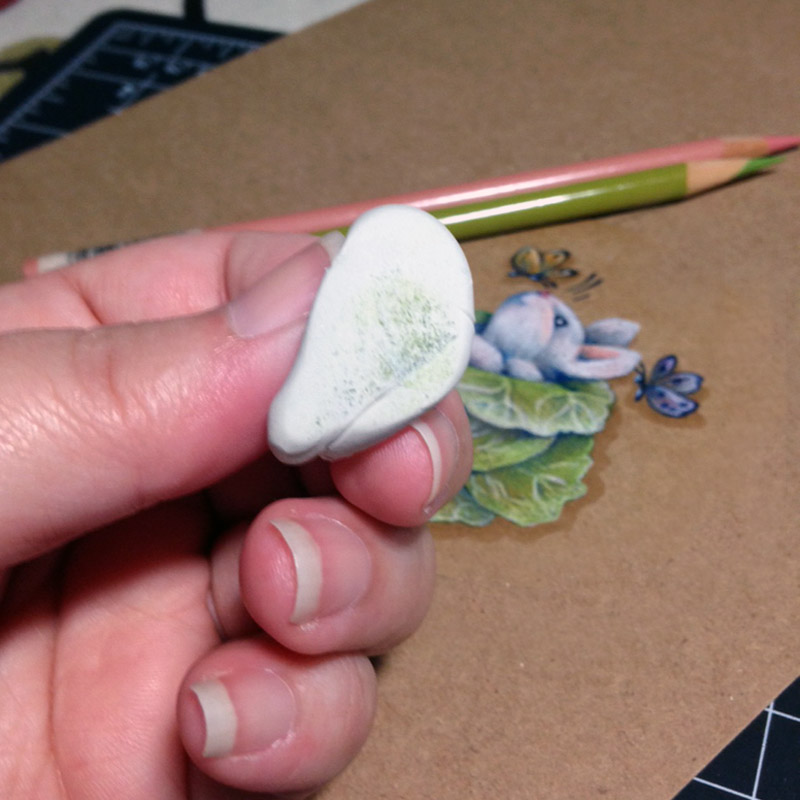
  3. The sticky tack will grab the paper; hold the paper down with one hand while gently peeling away the sticky tack with the other.

  4. Knead the residue into the eraser to create new clean surfaces.

  5. Repeat as necessary until you've lifted away the mistake.

Sticky tack lifts colored pencil without damaging the paper | VanillaArts.com

I know it sounds crazy but this stuff really works. Best of all, it doesn't damage the tooth of the paper the way rubbing erasers do.

The other benefit of this lift and remove method is that it eliminates transfer smudges. Let's face it, it's pretty easy to drag Prismacolor pigment into unwanted areas. I wear a drawing glove to prevent hand dragging marks. Rubbing erasers often pull color into your cleaning area... which then requires more rubbing. It's a vicious cycle.

Lifting mistakes straight upward eliminates the potential for eraser smudges.


When I make a mistake, I use the sticky tack eraser first

As I said, start with the fluffy bunny, not the T-Rex.

If the sticky tack can't remove the oops, move up to your white eraser. But give that sticky tack several tries first, because the white eraser will drag and transfer pigment.

But honestly, the sticky tack almost always removes enough of the pigment that I can go back and add the correct color.

Remember, you don't have to get down to naked paper in order to fix a mistake. Most Prismas are fairly opaque and can cover over much of the mistake.


Here's the rundown on sticky tack erasers:

Alternate Names-

Sticky tack, poster putty, sticky stuff, adhesive putty

Brands- 

Duck, Scotch... choose a quality WHITE putty. The dollar store stuff was gooey and left residue. The colored versions seem to be softer but less sticky. Make sure it's fresh and clean, the once-used stuff in your junk drawer may have collected grit.

Defining Features-

A soft putty that clings to waxy pigment enough to lift it away but will not damage the paper or leave a residue.

Best used on-

Wax based colored pencil marks and other media that sit on top of the paper surface. Will not work on liquids like ink or paint that absorb into paper fibers.

Price Range-

Very inexpensive. One package will run just a few dollars and provides enough for several years of daily use.

Available at-

Office supply stores, hardware stores, or similar aisles in any big-box retailer.


Sticky tack... who'da thunk?

Go get some today, your tooth will thank you for it.

Art tips and tools  VanillaArts.com